![]() TwitterKit offers you loads of functionality: login, sharing, viewing your timeline… In this post we’ll learn how to setup your twitter app and start using TwitterKit. We’ll cover some basic use cases that you’ll most likely use, like login and sharing. So, let’s get going.
TwitterKit offers you loads of functionality: login, sharing, viewing your timeline… In this post we’ll learn how to setup your twitter app and start using TwitterKit. We’ll cover some basic use cases that you’ll most likely use, like login and sharing. So, let’s get going.
Setting Up Your Twitter App
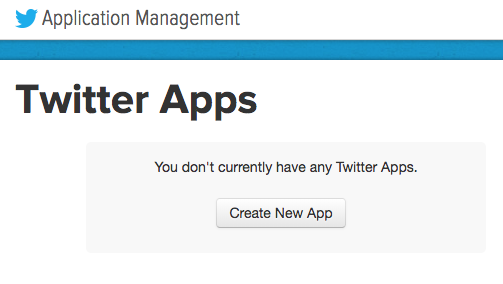
In this context ‘Twitter App’ has nothing to do with your Twitter iOS app. If you want to use TwitterKit you’ll need an API key and API secret. You can obtain these by going to apps.twitter.com and creating your Twitter App. If you followed the link from above, and if you don’t have any Twitter Apps, you’ll be greeted by a screen similar to this one:
If you click on ‘Create New App’ you’ll have to fill out a form with some basic info about your app:

Once you created your app, you’ll see you app details:
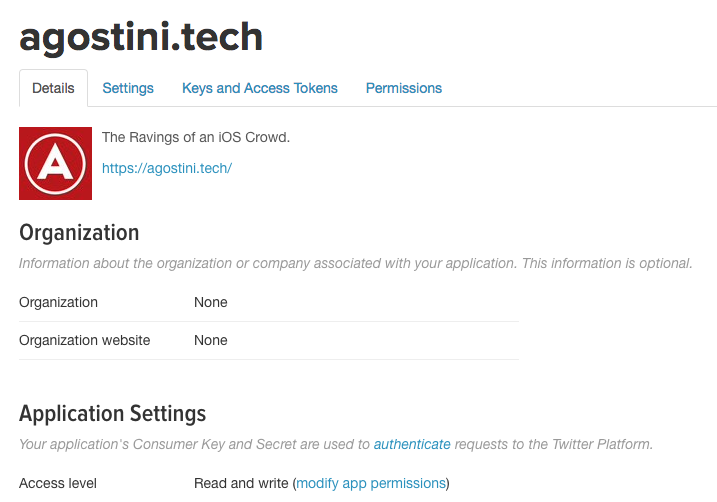
Make sure your ‘Access level’ is ‘Read and write’, it’s the default setting anyway, but just double-check in case they change the defaults in the future. I suggest changing your app icon, you can do it by selecting ‘Settings’ and you’ll see application icon at the bottom. The most important part here are your API keys. You can find them under ‘Keys and Access Tokens’.
Not much to do here, you should be all set. Now we need to set our project up.
Project Setup
The easiest way to install TwitterKit is to use cocoapods, so go on and update your podfile:
pod 'TwitterKit'
Run pod install and you should have the SDK ready to go. There are a few things you need to finish up before you can actually use TwitterKit. You’ll need to add a custom url scheme, so your app can be opened by twitter after your user grants access to it. This is easy to do. Select your project file, and the main target. Select the ‘Info’ tab, and you’ll see ‘URL Types’ at the bottom. Add your url scheme here, it should look something like this:

The screenshot above says ‘twitterkit-123’. You’ll need to replace ‘123’ with your ‘Consumer Key’ or ‘API Key’. This is going to be unique for your app.
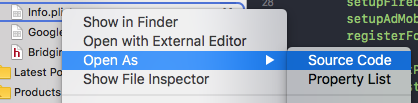
One last thing to do is to add application queries schemes. If you already use them, just add ‘twitter’ and ‘twitterauth’ to the list:

If you don’t use the application queries schemes, the simplest way to add these two is to open your ‘Info.plist’ file as a source code:
And in the source file add this snippet just before the ending </dict>:
<key>LSApplicationQueriesSchemes</key>
<array>
    <string>twitter</string>
    <string>twitterauth</string>
</array>
Save the file, and if you open your ‘Info.plist’ as a property list, you should see the two schemes in the table, something like the one two screenshots above.
The Code
So the boring part is over, we can finally start writing some code. There’s two more things you’ll need to do in your AppDelegate to finish setting up TwitterKit. Obviously, import TwitterKit at the top of the file:
import TwitterKit
You will need to initialize the SDK in your ‘applicationDidFinishLaunching…’ method. For this you’ll need your consumer key and secret (also called API key/secret). Somewhere in the ‘applicationDidFinishLaunching…’ add the initialization code:
TWTRTwitter.sharedInstance().start(withConsumerKey: "consumer_key", consumerSecret: "consumer_secret")
Next thing you’ll need to do is handle the url. When twitter opens your app, you will need to inform TwitterKit of this action, and pass all the data to the SDK. This all sounds complicated, but all you need to do is forward a call to TwitterKit, like so:
func application(_ app: UIApplication, open url: URL, options: [UIApplicationOpenURLOptionsKey : Any] = [:]) -> Bool {
   return TWTRTwitter.sharedInstance().application(app, open: url, options: options)
}
Now when your user authenticates your app, you’ll get a callback and the SDK will receive all the info it need (like username and tokens).
Twitter Login
You could use TwitterKit to offer login functionality for your users. After all the setup you went through, login will seem pretty trivial. Assuming you have a button on your UI that’s calling a function, your login function will look similar to this one:
private func loginTwitter() {
   TWTRTwitter.sharedInstance().logIn { (session, error) in
       if session != nil {
           print("logged in user: ", session?.userName) // prints: logged in user:  Optional("dagostin")
       } else {
           print("didn't log in: ", error)
       }
   }
}
Once your user selects the login button she will be presented with an alert similar to this one:
After which the user can decide whether she wants to allow access to your app or not:

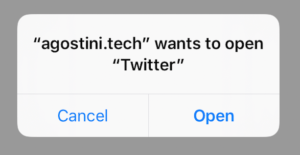
When the user selects ‘Connect’ Twitter will open your app:
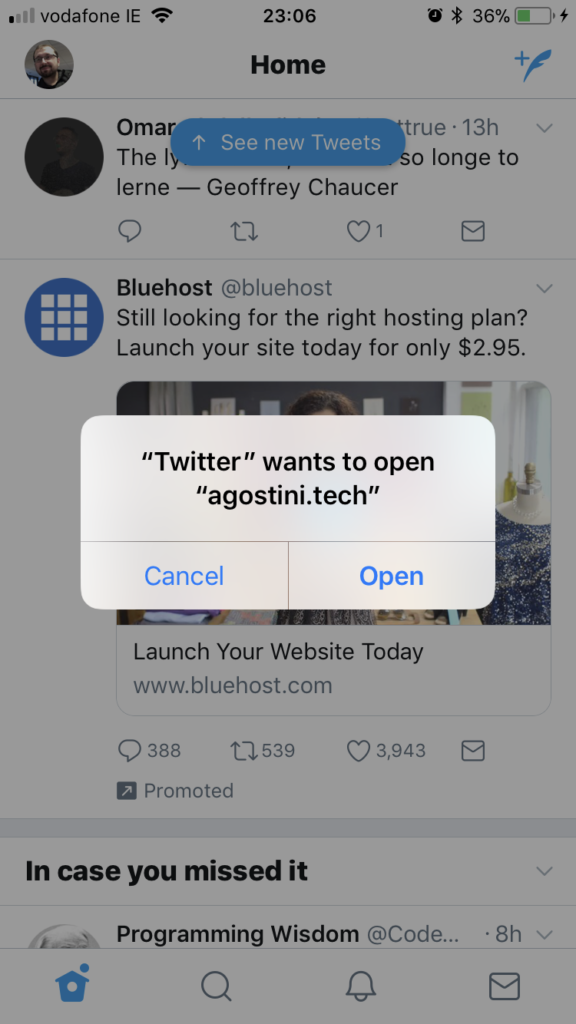
When the user selects ‘Open’ your app will be opened by Twitter and the user will be logged in. It’s simpler than it seems. All you need to do is implement that login function, and you’ll be fine.
Logout
At some point, you’ll want your user to log out. Logout function is simple enough:
private func logoutTwitter() {
   let sessionStore = TWTRTwitter.sharedInstance().sessionStore
   if let userID = sessionStore.session()?.userID {
       sessionStore.logOutUserID(userID)
   }
}
Sending Tweets
Login and logout are great, but you can do so much more with TwitterKit. One of the things you’ll most definitely want to do is share stuff. Sending tweets is quite simple, but before you start, you’ll have to implement some delegate callbacks:
extension PostDetailsViewController: TWTRComposerViewControllerDelegate {
    func composerDidCancel(_ controller: TWTRComposerViewController) {
        dismiss(animated: false, completion: nil)
    }

    func composerDidFail(_ controller: TWTRComposerViewController, withError error: Error) {
        dismiss(animated: false, completion: nil)
    }

    func composerDidSucceed(_ controller: TWTRComposerViewController, with tweet: TWTRTweet) {
        dismiss(animated: false, completion: nil)
    }
}
Think of it as boilerplate code 🙂 Now in your view controller that implemented these callbacks you’ll have a method to send a tweet. It can look something like this:
private func shareOnTwitter() {
    let composer = TWTRComposerViewController(initialText: "Just saying hello from agostini.tech", image: nil, videoURL: nil)
    composer.delegate = self
    present(composer, animated: true, completion: nil)
}
When you call this function, your user will be presented with a modal popover and a pre filled message:
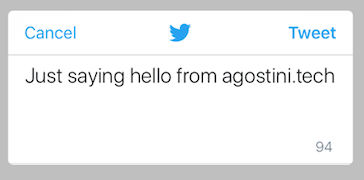
If the user selects ‘Tweet’ button, the tweet will appear on their profile. Congrats, you sent your first tween from within your app.
Conclusion
You do have UIActivityViewController that will handle the basics of sharing for you. And this might be sufficient for most people. But if you’re looking for something a lot more flexible, or if you want your users to be able to login with their twitter accounts, TwitterKit is a way to go.
SDK itself is pretty nice, but it’s a bit quirky. I only had two problems when trying to use it. The first one was with the logout function. If you followed their tutorials, they’re trying to logout all the logged in users. Because of the bad casts this won’t work in swift. You most likely won’t experience this, especially if you only allow one user to be logged in. The second issue I had was with the permissions of the app. Twitter App gets Read/Write permissions by default, but for some reason, when I created the app I only got Read access. I tried to log in, it was successful, but when trying to post, I kept getting kicked out with a 401 response code. If this happens to you, you’ll need to go to your Twitter App, make sure you have Read/Write permissions, and regenerate your consumer key and secret. After that, you will need to go to your twitter account (dagostin in my case) and remove the app from the list of authorized apps. Wait a few minutes and try again. This should sort it out for you.
This post was just an intro to get you started with TwitterKit. I hope you found it useful and that you learned something new today.
As usual, have a nice day 🙂
Dejan.
hi Dejan! Thanks for the well-written tutorial 🙂
I’m interested in using TwitterKit, but since it has been deprecated, would you instead use Twitter for Websites today, when it comes to displaying Tweets in iOS?
Here is a tutorial on using Twitter’s embed API in a WebKit view. I didn’t write it, just something I found when looking up the topic.
https://medium.com/@musmein/rendering-embedded-tweets-and-timelines-within-webview-in-ios-e48920754add
I’m new to iOS development, so please forgive me if this is a silly question. I’d love to hear your perspective as I don’t have much experience myself. I’ve tried downloading the sample code from Twitter Dev’s GitHub page, but the code is all in Swift 3.
If you’re open to sharing, how much effort would you think it would take to manually update the code to Swift 4 on my own and keep it up to date? I’d like to provide a great feel for my users when it comes to viewing Tweets, so it’s not a problem to spend the time and effort.
Thank you in advance, Dejan, and have a great week ahead!