Sending Data From Your App to Apple Watch Using WCSession
Dejan Agostini
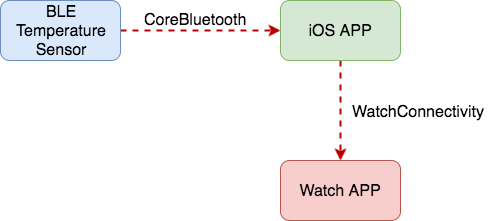
In one of my previous posts, I talked about how to create a temperature sensor using an Arduino and a BLE breakout circuit, and how to read that data from your iOS app. You can read more about it here: Creating a Temperature Sensor for iOS Using BLE and Arduino. In this post, we'll learn how to create a simple watchOS app, and pass that data to it. In the first part of the post, we'll learn about WatchConnectivity and how to use it in your iOS app. In the second part, we'll create our watch app.
WatchConnectivity and iOS
We have a few options to send data to our app, and we have to decide what's appropriate for us. If we take a look at the official Apple Documentation, we can see that we have 6 available options for sending data to the watch. 'sendMessage' and 'sendMessageData' will do what they advertise, they'll send the message to the watch, with a twist, the messages are queued. We'll be sending transient data in short intervals, so this might not be the best option for us. 'transerFile' is obviously not what we need, 'transferUserInfo' seems right, but since it's using a queue, we'll go with 'updateApplicationContext'. This method seems perfect for us. We'll be sending a small amount of data very often. And we simply want our watch app to reflect the state of our iOS app. So, let's go through the code, and see how to set it up.The code
Communication between the sensor and iOS app is done using CoreBluetooth, and you can read all about it in the post mentioned above. And communication between the app and the watch is done using WatchConnectivity and WCSession, like so: We already have a BLEManager class, we'll be using it. We'll add one more class to our project, let's call it 'WatchManager'. This class will be responsible for pushing data to our watch. The code for the class in not long, here it is:import Foundation
import WatchConnectivity
class WatchManager: NSObject {
public var bleManager: BLEManagable? {
willSet {
if newValue == nil {
bleManager?.removeDelegate(self)
}
}
didSet {
bleManager?.addDelegate(self)
}
}
fileprivate var watchSession: WCSession?
override init() {
super.init()
watchSession = WCSession.default()
watchSession?.delegate = self // We don't really need this, we'll just use it for debug.
watchSession?.activate()
}
deinit {
bleManager?.removeDelegate(self)
}
}
// MARK: BLEManagerDelegate
extension WatchManager: BLEManagerDelegate {
func bleManagerDidConnect(_ manager: BLEManagable) {
sendDictionary([DataKey.BLEConnected: true])
}
func bleManagerDidDisconnect(_ manager: BLEManagable) {
sendDictionary([DataKey.BLEConnected: false])
}
func bleManager(_ manager: BLEManagable, receivedDataString dataString: String) {
sendDictionary([DataKey.Temperature: dataString, DataKey.BLEConnected: true])
}
private func sendDictionary(_ dict: [String: Any]) {
do {
try self.watchSession?.updateApplicationContext(dict)
} catch {
print("Error sending dictionary \(dict) to Apple Watch!")
}
}
}
// MARK: WCSessionDelegate
extension WatchManager: WCSessionDelegate {
func session(_ session: WCSession, activationDidCompleteWith activationState: WCSessionActivationState, error: Error?) {
print("Session activation did complete")
}
public func sessionDidBecomeInactive(_ session: WCSession) {
print("session did become inactive")
}
public func sessionDidDeactivate(_ session: WCSession) {
print("session did deactivate")
}
}
We'll be using our BLEManager in this class, so we register ourselves as the delegate, in order to receive data from the Arduino. We'll be setting the BLEManager from our AppDelegate, so we can share the same instance with the 'ViewController'.
In the constructor of the class, we're setting our Watch Connectivity Session. We'll be using the default session, and once we have it set, we just need to activate it. We'll also set ourselves as the delegate of the WCSession, we don't really need to, since the data will be flowing only one way, to the watch. If we wanted to receive the data from the watch, we'll have to use these delegate callbacks.
Delegate callbacks from the BLEManager are all calling the 'sendDictionary' method, and they're sending the state of the BLE (connected/disconnected), and the actual temperature string. In the 'sendDictionary' method we're simply calling 'updateApplicationContext' method on our WCSession object. Now we're sending data to the watch, soon we'll learn how to use it on the watch.
Of course, we have to create our manager in the AppDelegate:
@UIApplicationMain
class AppDelegate: UIResponder, UIApplicationDelegate {

    var watchManager = WatchManager()
    var bleManager: BLEManagable = BLEManager()

    var window: UIWindow?

    func application(_ application: UIApplication, didFinishLaunchingWithOptions launchOptions: [UIApplicationLaunchOptionsKey: Any]?) -> Bool {

        watchManager.bleManager = bleManager

        if let vc = window?.rootViewController as? ViewController {
            vc.bleManager = bleManager
        }

        return true
    }
}
A thing of note from this code snippet is that we'll be using the same BLE manager for the watch manager and the view controller. There should be no surprises here. Next, let's take a look at the actual watch.
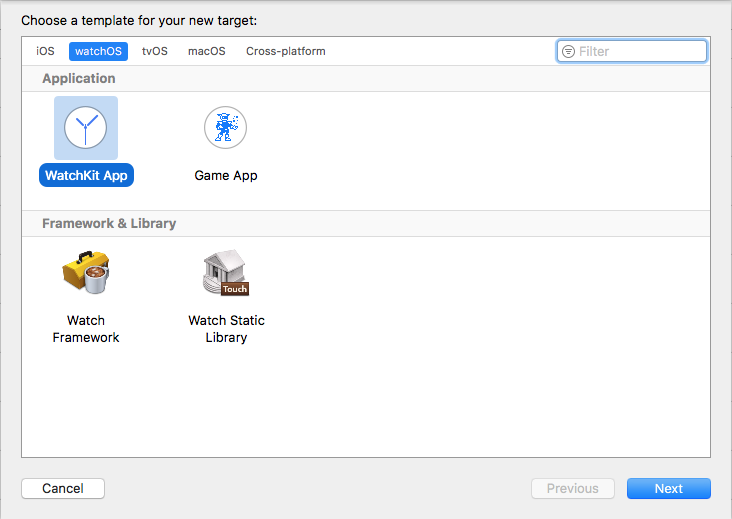 Click on the WatchKit App, and follow the wizard. Once you're done, you'll see two new targets. Your 'WatchApp', and your 'WatchApp Extension' targets, like so:
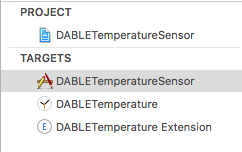 You might be wondering about the two targets you're seeing, and you expected to see only one. So, let's say a few words on Watch Apps architecture.
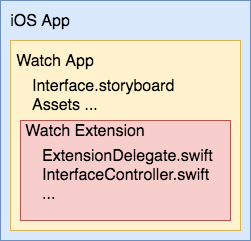
When you create your watch app, you get two targets. Your app, and your extension. Both of them are packaged within your main iOS app, and when you publish it on the store your watch app will get installed automatically. All your storyboards and assets are residing in the main watch target, in my case that is 'DABLETemperature' target, and all the code resides in the extension (DABLETemperature Extension) target. It's as simple as that. When you think about it, it makes some sense, since your watch can use complications, there's no need to load all the resources in the memory. Complications are beyond the scope of this post, maybe we'll cover them in one of the future posts.
Here is a visual representation of what I just said:
You might be wondering about the two targets you're seeing, and you expected to see only one. So, let's say a few words on Watch Apps architecture.
When you create your watch app, you get two targets. Your app, and your extension. Both of them are packaged within your main iOS app, and when you publish it on the store your watch app will get installed automatically. All your storyboards and assets are residing in the main watch target, in my case that is 'DABLETemperature' target, and all the code resides in the extension (DABLETemperature Extension) target. It's as simple as that. When you think about it, it makes some sense, since your watch can use complications, there's no need to load all the resources in the memory. Complications are beyond the scope of this post, maybe we'll cover them in one of the future posts.
Here is a visual representation of what I just said:
 That should be enough to get you started, so, let's see some code :)
 We'll be using the temperature value (label with 0.00℃) in our code. So let's just quickly show the counterpart file (InterfaceController.swift) and drag an outlet to it.
If you check out your file list for your extension, you'll notice some files, like 'ComplicationController.swift'. Which is used for displaying complications on your watch face. And 'ExtensionDelegate.swift' which is conceptually the same as 'AppDelegate.swift' in your standard iOS app. We'll be focusing here on our 'InterfaceController.swift' file, it's similar to your standard 'ViewController.swift'.
The code for our interface controller is pretty slim, which is great, here it is:
We'll be using the temperature value (label with 0.00℃) in our code. So let's just quickly show the counterpart file (InterfaceController.swift) and drag an outlet to it.
If you check out your file list for your extension, you'll notice some files, like 'ComplicationController.swift'. Which is used for displaying complications on your watch face. And 'ExtensionDelegate.swift' which is conceptually the same as 'AppDelegate.swift' in your standard iOS app. We'll be focusing here on our 'InterfaceController.swift' file, it's similar to your standard 'ViewController.swift'.
The code for our interface controller is pretty slim, which is great, here it is:
Watch App
If you're adding a watch app to your existing iOS project (like me), you'll have to create a new target for your watch. Just open your project, and below the list of targets, click on that plus sign, you'll see the next screen:
Click on the WatchKit App, and follow the wizard. Once you're done, you'll see two new targets. Your 'WatchApp', and your 'WatchApp Extension' targets, like so:
You might be wondering about the two targets you're seeing, and you expected to see only one. So, let's say a few words on Watch Apps architecture.
When you create your watch app, you get two targets. Your app, and your extension. Both of them are packaged within your main iOS app, and when you publish it on the store your watch app will get installed automatically. All your storyboards and assets are residing in the main watch target, in my case that is 'DABLETemperature' target, and all the code resides in the extension (DABLETemperature Extension) target. It's as simple as that. When you think about it, it makes some sense, since your watch can use complications, there's no need to load all the resources in the memory. Complications are beyond the scope of this post, maybe we'll cover them in one of the future posts.
Here is a visual representation of what I just said:
That should be enough to get you started, so, let's see some code :)
Watch App Code
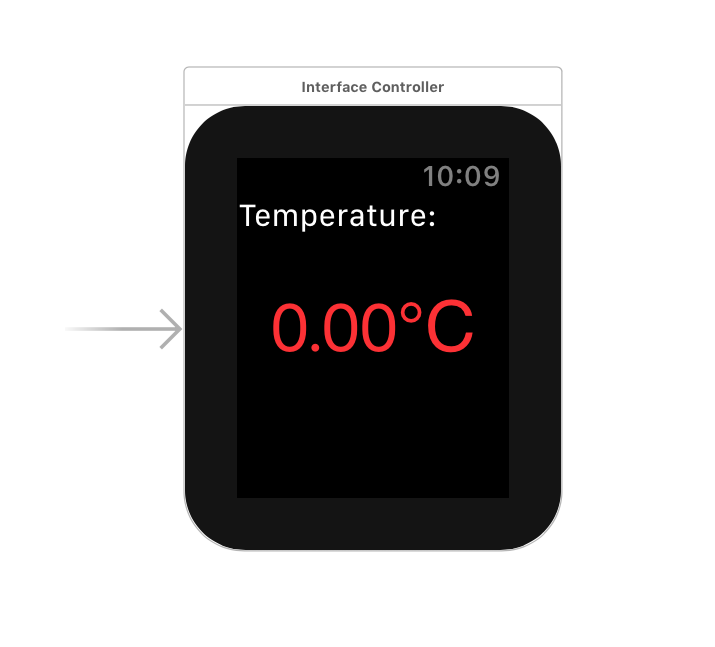
Let's create our interface first. In the 'Interface.storyboard' we have three Interface Controllers Scenes, we'll just use the initial one. Once we add two labels to it, it should look something like this:
We'll be using the temperature value (label with 0.00℃) in our code. So let's just quickly show the counterpart file (InterfaceController.swift) and drag an outlet to it.
If you check out your file list for your extension, you'll notice some files, like 'ComplicationController.swift'. Which is used for displaying complications on your watch face. And 'ExtensionDelegate.swift' which is conceptually the same as 'AppDelegate.swift' in your standard iOS app. We'll be focusing here on our 'InterfaceController.swift' file, it's similar to your standard 'ViewController.swift'.
The code for our interface controller is pretty slim, which is great, here it is:
import WatchKit
import Foundation
import WatchConnectivity


class InterfaceController: WKInterfaceController {

    var watchSession: WCSession? {
        didSet {
            if let session = watchSession {
                session.delegate = self
                session.activate()
            }
        }
    }

    @IBOutlet var temperatureLabel: WKInterfaceLabel!

    override func awake(withContext context: Any?) {
        super.awake(withContext: context)

        watchSession = WCSession.default()
    }
}

extension InterfaceController: WCSessionDelegate {
    func session(_ session: WCSession, activationDidCompleteWith activationState: WCSessionActivationState, error: Error?) {
        print("Session activation did complete")
    }

    func session(_ session: WCSession, didReceiveApplicationContext applicationContext: [String : Any]) {
        print("watch received app context: ", applicationContext)
        if let temperature = applicationContext[DataKey.Temperature] as? String {
            self.temperatureLabel.setText(temperature + "℃")
        }

        if let connected = applicationContext[DataKey.BLEConnected] as? Bool {
            self.temperatureLabel.setTextColor(connected == true ? UIColor.white : UIColor.red)
        }
    }
}
We can see our outlet for the temperature label, we also have our WCSession instance here. When we set the session, we set ourselves as the delegate and activate the session. Since the watch will be receiving data, it's important to set the delegate. We didn't care about the delegate on the iPhone.
In the 'awake' method we set our wcSession to the default session, and that's it. Now, all we need to do is wait for the delegate callbacks from the session, and respond to them.
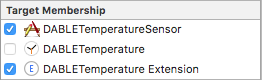
The only delegate callback we're actually interested is 'didReceiveApplicationContext'. This is the callback in which we'll actually receive the dictionary we're sending from our iOS app. We're sending two pieces of information in that dictionary, temperature string, and the connection state. Obviously, we display the temperature string on the watch face, and based on the connection state, we change the colour of the temperature label. It's important to note here that we're sharing one file between our two targets. 'WatchConstants' file has target membership set to the original iOS app, and to our extension. So make sure you don't forget to set it like it's shown in the following image:
 Now all the code is in place, run your app on your phone first, and then run it on the watch. XCode will start building/running the app on your Apple Watch. Go make yourself some hot cocoa, or open a can of beer, watch an episode of your favourite show, and after a couple of minutes (on my series 1 watch), you should see your app running.
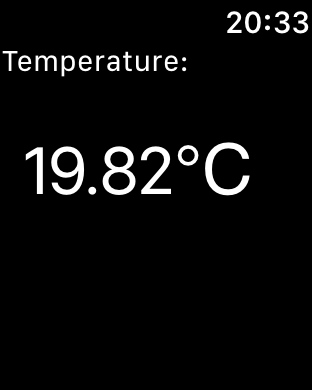
When the app starts receiving data, your interface should look something like this:
Now all the code is in place, run your app on your phone first, and then run it on the watch. XCode will start building/running the app on your Apple Watch. Go make yourself some hot cocoa, or open a can of beer, watch an episode of your favourite show, and after a couple of minutes (on my series 1 watch), you should see your app running.
When the app starts receiving data, your interface should look something like this:
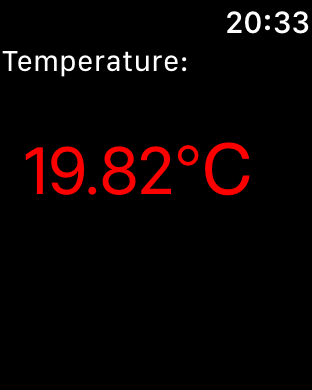
 You can see this value changing dynamically, just grab the temperature sensor with your fingers, and you'll see it updating. If your Arduino loses power, the label will turn red, like so:
 That's pretty much it. Now you're able to pass data from your iPhone to your watch app. You can pass data the other way, from the watch to the iPhone, it's pretty much the same.
Now all the code is in place, run your app on your phone first, and then run it on the watch. XCode will start building/running the app on your Apple Watch. Go make yourself some hot cocoa, or open a can of beer, watch an episode of your favourite show, and after a couple of minutes (on my series 1 watch), you should see your app running.
When the app starts receiving data, your interface should look something like this:
You can see this value changing dynamically, just grab the temperature sensor with your fingers, and you'll see it updating. If your Arduino loses power, the label will turn red, like so:
That's pretty much it. Now you're able to pass data from your iPhone to your watch app. You can pass data the other way, from the watch to the iPhone, it's pretty much the same.