Using Google Drive in Your App
Dejan Agostini
You probably know what Google Drive is, just in case you don't... it's a cloud bases storage. In this article we'll walk you through the setup procedure and cover some basic scenarios on how to use Google Drive in your apps. Let's get started.
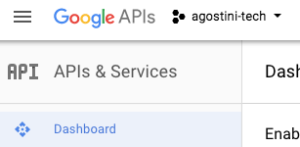 If you click on the drop-down menu, you'll be able to create a new project:
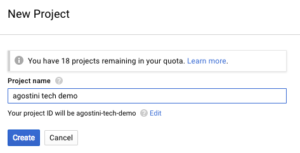
 Selecting the 'plus' button will lead you to a new screen where you can choose a name for your new project:
 When you create your new project, your Google Drive API should be enabled by default and you should be presented with a screen similar to this one:
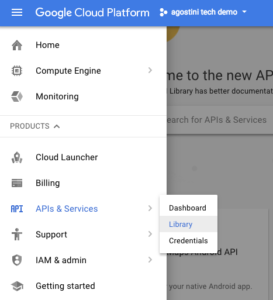
 In case this didn't happen for you, you can always enable the Google Drive manually. Select the menu icon in the top left, select 'API & Services' and 'Library' from it:
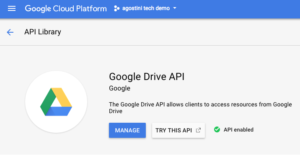
 If you search for 'Google Drive' you'll see it in the list, simply enable it from there:
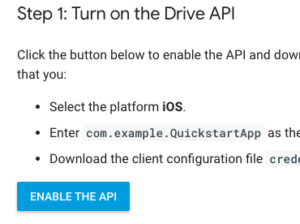
 Now we need to enable the API...
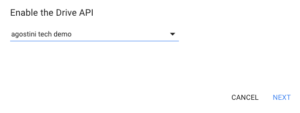
 You will be presented with a simple wizard where you will have to configure your OAuth client. You will need your bundle ID for this step. Select your project from the dropdown list:
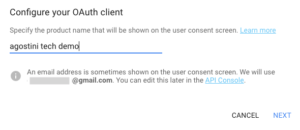
 Give it a nice name. Bear in mind that this name will be presented to your users when your app asks for permissions:
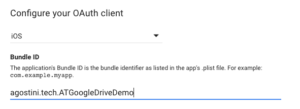
 After that select the platform and put in your bundle id:
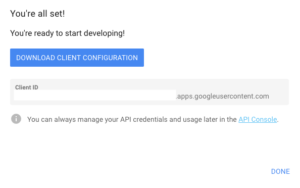
 You'll be taken to the last step where you can download your credentials that will contain the keys necessary for setting up your Xcode project:
 Next, we need to set up the project.
 You will find your reversed client id in the client configuration plist file that you downloaded previously.
That's it for setting everything up. Time to play in code :)
You will find your reversed client id in the client configuration plist file that you downloaded previously.
That's it for setting everything up. Time to play in code :)
Pre-flight
Before you can use Google Drive, we'll have to spend some time setting it up. Generally speaking, Google has great help pages and tutorials, but I had to scratch my head a couple of times when trying to make Google Drive work. You might have the same problems trying to set up API access for your project and in general, the code on Google is out of date and doesn't include swift examples.API Access
Before doing anything, we'll create a project on google cloud platform and enable Google Drive API access (this is enabled by default, btw). So, head to the google cloud platform website, you should see your existing projects (if you have any) in the upper left corner:
If you click on the drop-down menu, you'll be able to create a new project:
Selecting the 'plus' button will lead you to a new screen where you can choose a name for your new project:
When you create your new project, your Google Drive API should be enabled by default and you should be presented with a screen similar to this one:
If you search for 'Google Drive' you'll see it in the list, simply enable it from there:
Now we need to enable the API...
Enable API
Technically you should be able to do this step directly from the quick start guide, but it didn't work for me. I had to go through the above steps to create a project on the cloud console and enable the API. With the above steps finished, go to the iOS quick start guide on google and select the 'enable the API' button:
You will be presented with a simple wizard where you will have to configure your OAuth client. You will need your bundle ID for this step. Select your project from the dropdown list:
Give it a nice name. Bear in mind that this name will be presented to your users when your app asks for permissions:
After that select the platform and put in your bundle id:
You'll be taken to the last step where you can download your credentials that will contain the keys necessary for setting up your Xcode project:
Next, we need to set up the project.
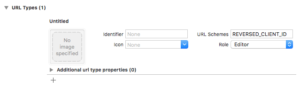
Project Setup
The only thing you need to do is set the custom URL scheme. Select your target, go to 'Info' tab, and add a new URL scheme under 'URL Types' section:
You will find your reversed client id in the client configuration plist file that you downloaded previously.
That's it for setting everything up. Time to play in code :)
The Code
Google Drive REST API wrapper library is available on cocoapods, so it's real easy to get started, go and update your 'Podfile' with the following:pod 'GoogleAPIClientForREST/Drive', '~> 1.2.1'
pod 'GoogleSignIn', '~> 4.1.1'
Run pod install from the terminal, and open you workspace. One last thing to do is to initialise the SDK. Initialise the SDK from your AppDelegate, within 'didFinishLaunching...' function:
GIDSignIn.sharedInstance().clientID = "CLIENT_ID"
You can find the 'CLIENT_ID' in the credentials.plist file that you downloaded from the quick start guide.
We created a custom URL scheme for our app, which means we'll have to handle incoming URLs. While we're in the AppDelegate, let's finish this:
func application(_ application: UIApplication, open url: URL, sourceApplication: String?, annotation: Any) -> Bool {
    return GIDSignIn.sharedInstance().handle(url, sourceApplication: sourceApplication, annotation: annotation)
}

func application(_ app: UIApplication, open url: URL, options: [UIApplicationOpenURLOptionsKey : Any] = [:]) -> Bool {
    let sourceApplication = options[UIApplicationOpenURLOptionsKey.sourceApplication] as? String
    let annotation = options[UIApplicationOpenURLOptionsKey.annotation]
    return GIDSignIn.sharedInstance().handle(url, sourceApplication: sourceApplication, annotation: annotation)
}
Sign In
Obviously, your users will need to sign in to their google account in order to use Google Drive. And we'll need to set the permissions levels. We can do all of that in a short function:fileprivate let service = GTLRDriveService()
private func setupGoogleSignIn() {
GIDSignIn.sharedInstance().delegate = self
GIDSignIn.sharedInstance().uiDelegate = self
GIDSignIn.sharedInstance().scopes = [kGTLRAuthScopeDriveFile]
GIDSignIn.sharedInstance().signInSilently()
}
We keep an instance variable to the Google Drive service, we'll need it later. The only interesting parts of this function is the 'scopes' that we're setting. In our example we're using a scope of 'DriveFile' this means that your app will have read/write permissions on the files/folders it creates. This is exactly what we need. 'signInSilently()' will try to sign the user using the previous session's token.
Once the sign in is complete, we have to save the 'authorizer' (assign it to our service's 'authorizer' variable), which is a small class that the SDK will use to authorise all your requests:
// MARK: - GIDSignInDelegate
extension ViewController: GIDSignInDelegate {
    func sign(_ signIn: GIDSignIn!, didSignInFor user: GIDGoogleUser!, withError error: Error!) {
        if let _ = error {
            service.authorizer = nil
        } else {
            service.authorizer = user.authentication.fetcherAuthorizer()
        }
    }
}
Now we'll create a small class that we'll use to manage files on Google Drive.
Our Google Drive Wrapper
We'll create a small wrapper around Google Drive REST API and pass in the Google Drive Service that we saved in previously:private let service: GTLRDriveService
init(_ service: GTLRDriveService) {
self.service = service
}
Now we'll create methods for listing files, uploading and deleting.
Listing Files
Before writing other functions, we'll create a small utility function that will allow us to get object IDs. Both, files and folders have object IDs and you'll need these for pretty much everything you do with Google Drive. We'll need a function for searching, like so:public func search(_ fileName: String, onCompleted: @escaping (String?, Error?) -> ()) {
let query = GTLRDriveQuery_FilesList.query()
query.pageSize = 1
query.q = "name contains '\(fileName)'"
service.executeQuery(query) { (ticket, results, error) in
onCompleted((results as? GTLRDrive_FileList)?.files?.first?.identifier, error)
}
}
We are creating a simple query here that is returning the first object it finds. We'll use this when we search for our folder that we'll be using for uploading.
Now we can move on to listing files. We'll use two functions for this:
public func listFilesInFolder(_ folder: String, onCompleted: @escaping (GTLRDrive_FileList?, Error?) -> ()) {
    search(folder) { (folderID, error) in
        guard let ID = folderID else {
            onCompleted(nil, error)
            return
        }
        self.listFiles(ID, onCompleted: onCompleted)
    }
}

private func listFiles(_ folderID: String, onCompleted: @escaping (GTLRDrive_FileList?, Error?) -> ()) {
    let query = GTLRDriveQuery_FilesList.query()
    query.pageSize = 100
    query.q = "'\(folderID)' in parents"

    service.executeQuery(query) { (ticket, result, error) in
        onCompleted(result as? GTLRDrive_FileList, error)
    }
}
Our 'listFilesInFolder' function will try to search for a folder in order to get the object ID. In the second method we'll be using this ID to search for files that have this ID set as one of the parents (essentially, a folder). And that's it for listing the files.
This function will give us an 'GTLRDrive_FileList' object, which is a collection of files. Naturally, this array won't contain the actual files, just some info about the files. If we want to download the file to our device we need another function. Fortunately, this is a simple one:
public func download(_ fileID: String, onCompleted: @escaping (Data?, Error?) -> ()) {
    let query = GTLRDriveQuery_FilesGet.queryForMedia(withFileId: fileID)
    service.executeQuery(query) { (ticket, file, error) in
        onCompleted((file as? GTLRDataObject)?.data, error)
    }
}
We only need to pass in the file id and execute the query. In the closure we'll get the data. Now, let's check out how to upload files.
Uploading Files
We'll be uploading all our files in one folder, so to keep things clean on the user's Google Drive. We'll need a utility function that will enable us to create folders:public func createFolder(_ name: String, onCompleted: @escaping (String?, Error?) -> ()) {
let file = GTLRDrive_File()
file.name = name
file.mimeType = "application/vnd.google-apps.folder"
let query = GTLRDriveQuery_FilesCreate.query(withObject: file, uploadParameters: nil)
query.fields = "id"
service.executeQuery(query) { (ticket, folder, error) in
onCompleted((folder as? GTLRDrive_File)?.identifier, error)
}
}
Google Drive treats folders just like files, they only have a special MIME type.
Now we can work on our upload functions. We'll use two functions, one will be a public function that will simplify the interface, and another one will actually upload the file:
public func uploadFile(_ folderName: String, filePath: String, MIMEType: String, onCompleted: ((String?, Error?) -> ())?) {

    search(folderName) { (folderID, error) in

        if let ID = folderID {
            self.upload(ID, path: filePath, MIMEType: MIMEType, onCompleted: onCompleted)
        } else {
            self.createFolder(folderName, onCompleted: { (folderID, error) in
                guard let ID = folderID else {
                    onCompleted?(nil, error)
                    return
                }
                self.upload(ID, path: filePath, MIMEType: MIMEType, onCompleted: onCompleted)
            })
        }
    }
}

private func upload(_ parentID: String, path: String, MIMEType: String, onCompleted: ((String?, Error?) -> ())?) {

    guard let data = FileManager.default.contents(atPath: path) else {
        onCompleted?(nil, GDriveError.NoDataAtPath)
        return
    }

    let file = GTLRDrive_File()
    file.name = path.components(separatedBy: "/").last
    file.parents = [parentID]

    let uploadParams = GTLRUploadParameters.init(data: data, mimeType: MIMEType)
    uploadParams.shouldUploadWithSingleRequest = true

    let query = GTLRDriveQuery_FilesCreate.query(withObject: file, uploadParameters: uploadParams)
    query.fields = "id"

    self.service.executeQuery(query, completionHandler: { (ticket, file, error) in
        onCompleted?((file as? GTLRDrive_File)?.identifier, error)
    })
}
In our public 'uploadFile' function, we're trying to find an existing folder, if it doesn't exist, we create a new one. We're searching for the folder because we need the object identifier in order to upload the file to the folder. In the second function we're using this object ID to set the parent of the new file. Note how one file can have many parents, meaning, they can be in multiple folders.
We created a data object with our file path, and set some parameters, including the MIME type. All that's left is to execute the query, and that's it.
Deleting Files
There's only one function left to cover, and that's the delete function. This one is just as simple as the 'download' function. All we need is the file id, and execute a query:public func delete(_ fileID: String, onCompleted: ((Error?) -> ())?) {
let query = GTLRDriveQuery_FilesDelete.query(withFileId: fileID)
service.executeQuery(query) { (ticket, nilFile, error) in
onCompleted?(error)
}
}
There we go, we have our basic file operations. Let's see how to test it out...
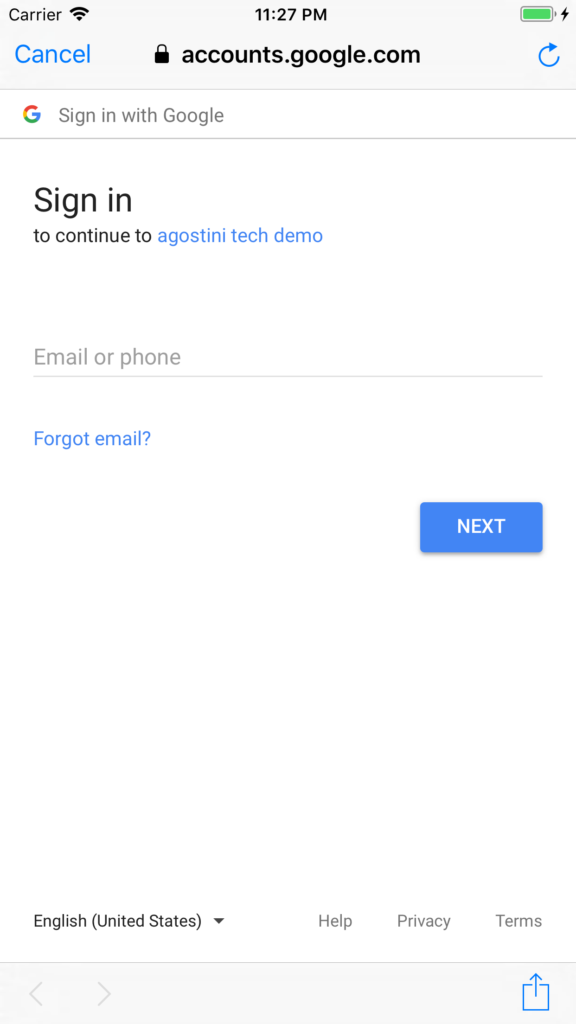
 You'll be redirected to the Sign In page, where you can sign in with your Google Account:
 After which, you will have to grant access to the app that you configured while configuring the OAuth client a couple of paragraphs ago:
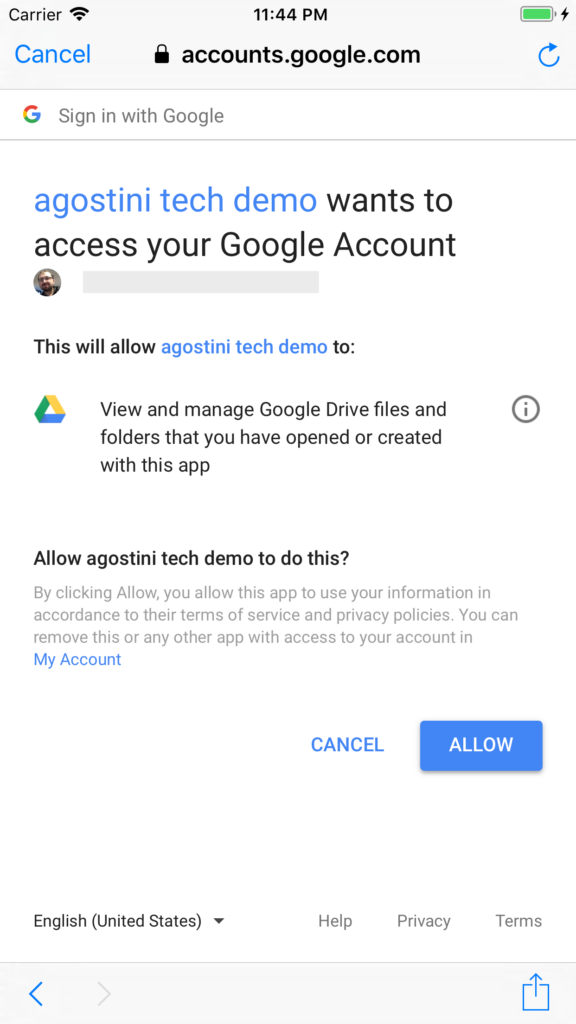 Just bear in mind, if you changed the permissions scope in your code, you will have to reset your simulator to clear the keychain and ask for permissions again.
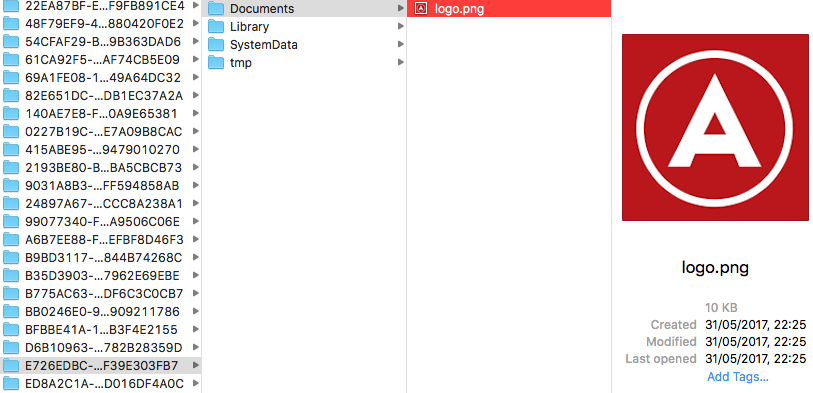
Now that we've signed in, we'll upload a simple image. In this demo we'll upload the site logo. The easiest way to do this, without having to work too much on the UI is to copy files to your app documents directory, something like this:
Just bear in mind, if you changed the permissions scope in your code, you will have to reset your simulator to clear the keychain and ask for permissions again.
Now that we've signed in, we'll upload a simple image. In this demo we'll upload the site logo. The easiest way to do this, without having to work too much on the UI is to copy files to your app documents directory, something like this:
 So our button action can be as simple as possible:
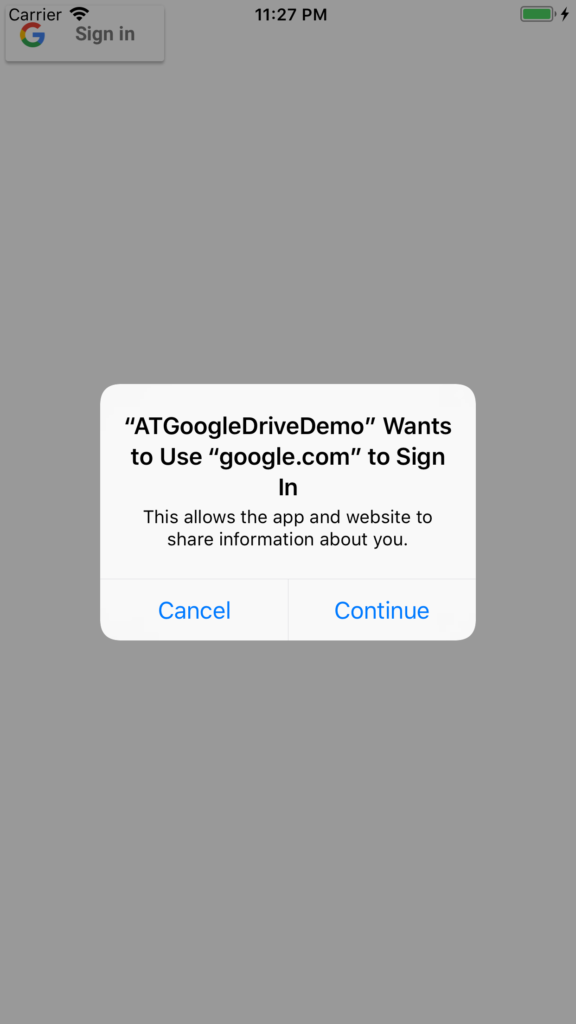
Testing It Out
This is just a demo app, and like all our demo apps, the UI is pretty elemental :) We'll have a Google Sign In button on the UI. Once you tap it, you will be redirected to the Google Sign In page, the app will ask for permissions to use google.com to sign in, go ahead and tap 'Continue':
You'll be redirected to the Sign In page, where you can sign in with your Google Account:
After which, you will have to grant access to the app that you configured while configuring the OAuth client a couple of paragraphs ago:
Just bear in mind, if you changed the permissions scope in your code, you will have to reset your simulator to clear the keychain and ask for permissions again.
Now that we've signed in, we'll upload a simple image. In this demo we'll upload the site logo. The easiest way to do this, without having to work too much on the UI is to copy files to your app documents directory, something like this:
So our button action can be as simple as possible:
@IBAction func uploadAction(_ sender: Any) {
    if let documentsDir = FileManager.default.urls(for: .documentDirectory, in: .userDomainMask).last {
        let testFilePath = documentsDir.appendingPathComponent("logo.png").path
        drive?.uploadFile("agostini_tech_demo", filePath: testFilePath, MIMEType: "image/png") { (fileID, error) in
            print("Upload file ID: \(fileID); Error: \(error?.localizedDescription)")
        }
    }
}
Obviously, you'll be uploading files that make sense for you :)
Our masterpiece of a UI will have three buttons and a label:
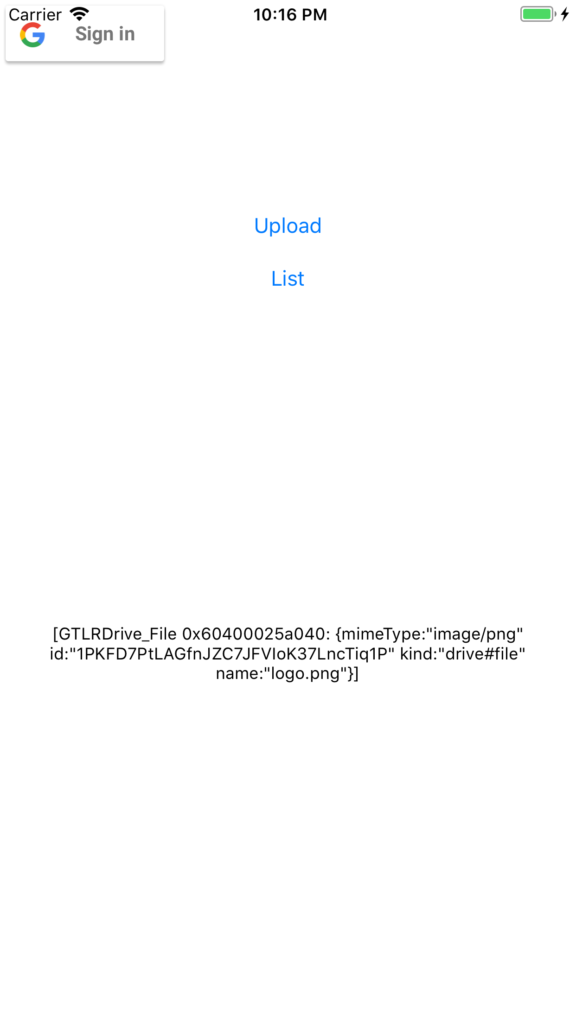 Tapping the 'Upload' button will upload the above image to Google Drive. If we tap on the 'List' button next, we'll see the content of the folder listed on the screen.
Here's the file on the drive:
Tapping the 'Upload' button will upload the above image to Google Drive. If we tap on the 'List' button next, we'll see the content of the folder listed on the screen.
Here's the file on the drive:
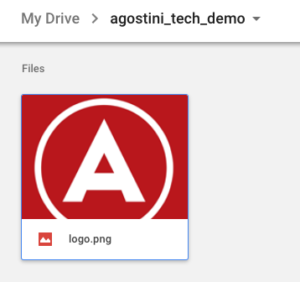 There you go, we can now use Google Drive as a storage solution. You can so some pretty interesting things with this. If the same user logs in on different devices, or on the same device but with a different app you made, they all have access to the same data.
Tapping the 'Upload' button will upload the above image to Google Drive. If we tap on the 'List' button next, we'll see the content of the folder listed on the screen.
Here's the file on the drive:
There you go, we can now use Google Drive as a storage solution. You can so some pretty interesting things with this. If the same user logs in on different devices, or on the same device but with a different app you made, they all have access to the same data.