Custom Transitions Using Segues
Dejan Agostini

We're all used to the default transitions between view controllers that we get for free. But sometimes we just want to keep the users' attention to certain elements. Custom transitions are a great way of controlling user focus. In this article we are going to implement come custom transitions using segues. Let's get started
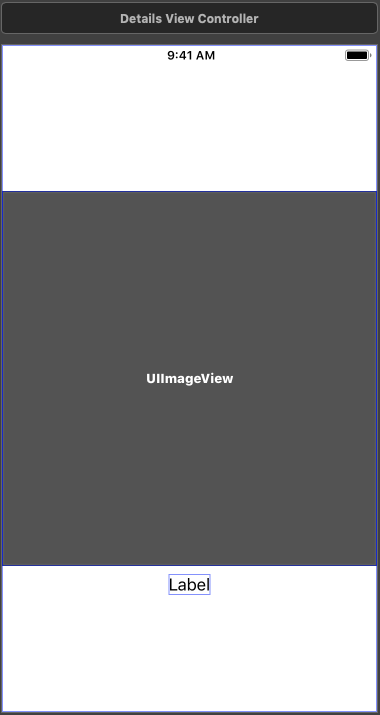
 Nothing fancy, right :) And the second view controller will look something like this:
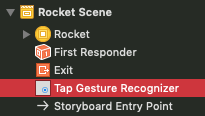
 Add a tap gesture recognizer to the image view on the first view controller and control+drag it from the document outline to the details view controller, select 'Present Modally' from the action segue section:
 Now add another tap gesture recognizer to the image view on the details view controller. And leave it for now, we'll come back to it in a bit.
Go to the source file for your details view controller and create/connect the outlets for the image view and the label. Now we just need to add a few properties. This is the whole class:
Now add another tap gesture recognizer to the image view on the details view controller. And leave it for now, we'll come back to it in a bit.
Go to the source file for your details view controller and create/connect the outlets for the image view and the label. Now we just need to add a few properties. This is the whole class:
The App
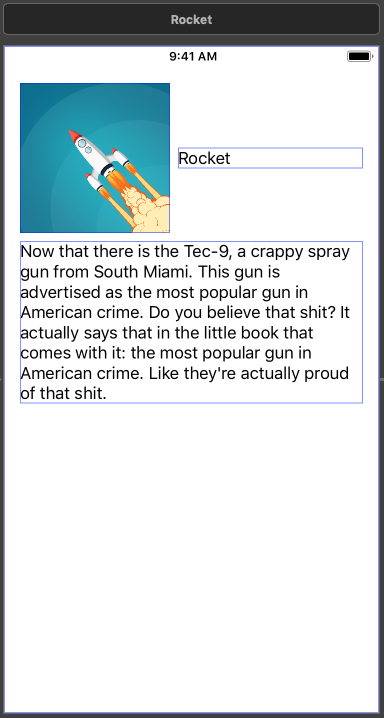
The code will be pretty simple but we'll need to setup our demo interface. We'll have a simple app that will display a small image with a title and description. When we tap on the image it will expand into a full screen image with a title below it. We'll need our two view controllers. The initial view controller will look something like this:
Nothing fancy, right :) And the second view controller will look something like this:
Add a tap gesture recognizer to the image view on the first view controller and control+drag it from the document outline to the details view controller, select 'Present Modally' from the action segue section:
Now add another tap gesture recognizer to the image view on the details view controller. And leave it for now, we'll come back to it in a bit.
Go to the source file for your details view controller and create/connect the outlets for the image view and the label. Now we just need to add a few properties. This is the whole class:
import UIKit

class DetailsViewController: UIViewController {

    public var image: UIImage?
    public var imageTitle: String?

    @IBOutlet weak var imageView: UIImageView!
    @IBOutlet weak var titleLabel: UILabel!

    override func viewDidLoad() {
        super.viewDidLoad()

        self.imageView.image = image
        self.titleLabel.text = imageTitle
    }
}
Nothing unusual there, right :) Let's finish setting up the initial view controller. In the source file create/connect the outlets for the image view and the image title label. We won't need the image description label in our example. Next, we'll add two functions :
import UIKit

class ViewController: UIViewController {

    @IBOutlet weak var imageView: UIImageView!
    @IBOutlet weak var titleLabel: UILabel!

    override func prepare(for segue: UIStoryboardSegue, sender: Any?) {
        if let detailVC = segue.destination as? DetailsViewController {
            detailVC.image = imageView.image
            detailVC.imageTitle = titleLabel.text
        }
    }
    @IBAction func unwindToViewController(_ unwindSegue: UIStoryboardSegue) {
        // Use data from the view controller which initiated the unwind segue
    }
}
In the prepare for segue function, we're setting the image and the title properties on the details view controller. If you're using multiple segues in your view controller, you might want to check for the proper identifier. We'll keep things simple in this example.
The last function will be used to dismiss the details view controller. In the storyboard control+drag the tap gesture recognizer in the details view controller to the 'Exit' object in the same view controller. A menu will pop up where you can select the function that we just created. This will unwind the segue to the view controller that's implementing this function.
You can run the app now to make sure you can show and dismiss the details view controller. And now we're ready to create our custom transition.
Custom Transition
The main thing that we'll need is the animator. This is just a class that conforms to the 'UIViewControllerAnimatedTransitioning' protocol. We could have our view controller conform to this protocol, but for the sake of readability we'll put it in a separate class. The class is quite small:import UIKit
class ShowDetailsAnimator: NSObject {
}
extension ShowDetailsAnimator: UIViewControllerAnimatedTransitioning {
func transitionDuration(using transitionContext: UIViewControllerContextTransitioning?) -> TimeInterval {
return 0.5
}
func animateTransition(using transitionContext: UIViewControllerContextTransitioning) {
guard
let toVC = transitionContext.viewController(forKey: .to) as? DetailsViewController,
let fromVC = transitionContext.viewController(forKey: .from) as? ViewController else {
return
}
let toView = transitionContext.view(forKey: .to)
if let view = toView {
transitionContext.containerView.addSubview(view)
}
toView?.frame = fromVC.imageView.frame
toView?.layoutIfNeeded()
let duration = transitionDuration(using: transitionContext)
let frame = transitionContext.finalFrame(for: toVC)
toVC.titleLabel.alpha = 0.0
UIView.animate(withDuration: duration, animations: {
toVC.titleLabel.alpha = 1.0
toView?.frame = frame
toView?.layoutIfNeeded()
}) { (success) in
transitionContext.completeTransition(true)
}
}
}
Transition duration is self-explanatory :) Our transition animation will happen in the 'animateTransition' function.
The transition context parameter will contain the source and destination views and view controllers involved in the transition. It will also contain the container view which will act as a superview of the views involved in the transition. Source view will be setup for us automatically, so we need to set the destination view. We add it to the container view and set the initial frame. You can see that we're also animating the alpha of the title label.
All that's left to do is to call the UIView's animate function where we animate the label's alpha and the destination frame. It's important to call the 'completeTransition' function on the context in the completion block of the animation.
That was pretty simple, right :) Now we have two options. We can use this animator directly from our view controller by conforming to the 'UIViewControllerTransitioningDelegate' or we can use a segue. Let's use a segue here, just for fun :)
Our custom segue will be super simple:
import UIKit

class ShowDetailsSegue: UIStoryboardSegue {
    override func perform() {
        destination.transitioningDelegate = self
        super.perform()
    }
}

extension ShowDetailsSegue: UIViewControllerTransitioningDelegate {

    func animationController(forPresented presented: UIViewController,
                             presenting: UIViewController,
                             source: UIViewController) -> UIViewControllerAnimatedTransitioning?
    {
        return ShowDetailsAnimator()
    }
}
We set ourselves as the transitioning delegate of the destination view controller and implement the delegate function. In the delegate function, we return the instance of our animator. And that's it...
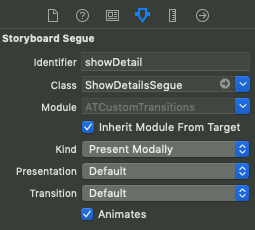
Remember how we set our tap gesture recognizer and the segue for displaying the details view controller. Go back to the main storyboard and select that segue. You have to select the class of the segue to be our custom segue:
 And, with that, we have our custom transition. Build and run, it should look something like this:
The animation duration in the example above is set to 2 seconds, so you can better see what's going on.
With just a few lines of code we got ourselves a custom transition. This is just a simple transition, but you can easily expand on this example and create some really complicated transitions.
And, with that, we have our custom transition. Build and run, it should look something like this:
The animation duration in the example above is set to 2 seconds, so you can better see what's going on.
With just a few lines of code we got ourselves a custom transition. This is just a simple transition, but you can easily expand on this example and create some really complicated transitions.