 Coding styles can be a religious topic for some developers. It’s one of those topics where everyone has a strong opinion. Opinions aside, once we agree on a coding style and start following it, it’s easy to forget to apply it. When we’re trying to solve a problem it’s easy to forget about the newlines and spaces. Formatting code is a repetitive task that a machine will do a lot better than us. In this article you’ll learn how to format your code with SwiftFormat. A popular little library for formatting swift code.
Why Use A Library
A coding style will improve the readability of your classes. Having a uniform coding style just makes it easier for other team members to jump into someone else’s code. Like we mentioned before, machines are good at automating. While it’s easy for us to forget some of the coding style guidelines a machine won’t have that problem.
Of course, a formatting library can’t do everything. It can take care of formatting for you and enforce some rules, and that is a huge help. This will leave developers free to focus on the problem solving and not worry about formatting the code. The same goes for pull requests. Reviewers can actually focus more on the code and the business logic, which will result in a higher quality codebase.
SwiftFormat
SwiftFormat is a great library for formatting your swift code. It’s been around since 2016 and it’s quite popular. It’s very easy to setup, so let’s do that now.
Setup
Probably the easiest way to setup the library up is by using Homebrew. You can also use cocoapods if you wanted to install SwiftFormat into your project directory (if you want to install a specific version). Here, we’ll use Homebrew. It’s just two commands:
You’re probably anxious to start using your brand new formatter, before you do, make sure you have the latest versions of Xcode and MacOS. I had a problem with the tool not running because my MacOS was still running 10.14.3. If you experience the same issue (libswiftCore.dylib not loading) updating the MacOS should fix it.
Rules And Options
You could simply navigate to your project directory from terminal and run the formatter with the default rules:
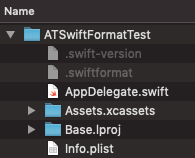
But, let’s play with a couple of things first. In your project directory create a file named ‘.swift-version’ and save the swift version number in it (it’s a simple file with just one number). Also, create a file named ‘.swiftformat’. In this file we’ll add our custom options. If you’re showing hidden files in your finder, your project directory might look like this:

SwiftFormat has a lot of rules and options, you can check them out here. We’ll play with just a few of them, to give you a feel for how it’s like to work with the tool. No doubt, you’ll customize them to your liking. Here’s an example of how our file looks like:
Yes, you can modify the headers of source files that easily. This is a great feature for bigger companies where they have a standard template for header files.
Some of the options are pretty cool, for example, you can use self in the initializers only and remove it in the rest of the class. You can also enable/disable each individual rule by adding the rule name to this file and prefixing it with ‘–enable/–disable’. Excluding files/folders from formatting is implied, of course.
Let’s Format
Now that we have our few custom rules set, let’s try to format a piece of code that was written by an anti-OCD, drunken version of me:
Clearly this code is not formatted well. Let’s see what SwiftFormat can do for us:
This looks much better, doesn’t it (a small note: Gitlab is using 8 spaces for tabbing, for some glorious reason, so this code looks better in Xcode). And look, sorted imports 🙂 A lot of the redundant code was removed (initializing optionals to nil, semicolons, get in a read only property, break in the switch…). Notice how SwiftFormat added a colon to the end of the TODO. The only thing I’ve noticed is that it left the braces in the same line in some cases, even though we explicitly enabled the Allman style braces. But considering how the code looked like before, this is good enough for me 🙂
Conclusion
Code formatting is something that we can leave for the machines to do so we can focus on solving problems in code. This little tool is pretty good at it. You can easily integrate it with your CI and forget about it. And it’s definitely going to save you time and improve code quality, because reviewers won’t have to waste time focusing on code formatting. This little tool is definitely worth trying out, especially if you work in a team and have a CI pipeline set.
I hope you found a new toy to play with today and that you had some fun reading the article 🙂 As usual…
Have a nice day 🙂
~D;

Take a look at https://github.com/realm/SwiftLint as an alternative package.
I just finished writing an article about it and I’ll publish it probably next week 😀