Receiving Incoming Calls With PushKit
Dejan Agostini

We already talked about CallKit and how to use the system UI to display the standard calling UI for incoming/outgoing calls. CallKit is great for displaying the UI, but what when your app is in the background. Push Notifications are not reliable by design, so we need something better. Enter PushKit... In this article we'll talk about receiving incoming calls with PushKit.
 Next thing you'll need is the VoIP certificate. Create a new certificate, when selecting a type, select the 'VoIP Services Certificate':
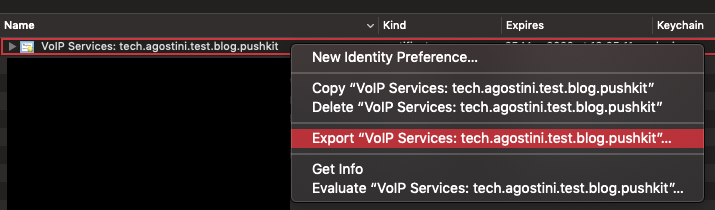
 Just follow the instructions until you're finished, and download your new '.cer' file. Double click on the file to import it into the keychain. Now you can export the '.p12' file, set a password when exporting:
 One last thing we have to do is create a '.pem' file. Open the terminal, navigate to the folder where you saved your '.p12' file and type in:
PushKit
Push notifications are not reliable. We don't experience that because almost all of them get delivered almost instantaneously, but Apple does say that we shouldn't use push notifications for critical functionality. We could use the silent notifications to notify the app about an incoming call, but why use push if we can use something more reliable :) PushKit notification is more reliable than your normal push notification, but it's very limited. PushKit only supports three notification types: VoIP, complications and file provider. So, out of those three almost everyone will be using the VoIP notification type :) Let's be honest, who remembers complications any more :) The principles of PushKit notifications are very similar to your standard push notifications. If you understand one, you'll understand the other. Let's go over setting it up. We'll use the ATCallKit demo app to integrate it. You'll need an Apple Developer account if you want to follow along.Certificates And Identifiers
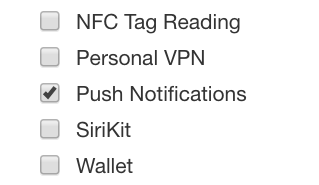
Head over to your Apple Developer account and create a new App ID and make sure you select the 'Push Notifications' checkmark:
Next thing you'll need is the VoIP certificate. Create a new certificate, when selecting a type, select the 'VoIP Services Certificate':
Just follow the instructions until you're finished, and download your new '.cer' file. Double click on the file to import it into the keychain. Now you can export the '.p12' file, set a password when exporting:
One last thing we have to do is create a '.pem' file. Open the terminal, navigate to the folder where you saved your '.p12' file and type in:
DejanMBP:Desktop dejan$ openssl pkcs12 -in voipCert.p12 -out voipCert.pem
Enter Import Password:
MAC verified OK
Enter PEM pass phrase:
Verifying - Enter PEM pass phrase:
After entering your password, you'll have the '.pem' file. We'll need this to test our push notifications. Let's set up the project next...
 Finally, time for some code :)
The Project
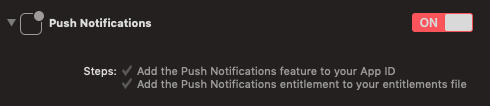
As you might have imagined, setting up the project for push notifications will be very complicated :) Make sure you use the same bundle ID and enable the push notifications in the capabilities tab of the target:
Finally, time for some code :)
The Code
The only thing you'll need is the push registry and the delegate callbacks. We're only interested in VoIP notifications so we'll set those as the desired push type. Make sure you set your delegate before registering for the types:private let voipRegistry = PKPushRegistry(queue: nil)
public func configurePushKit() {
voipRegistry.delegate = self
voipRegistry.desiredPushTypes = [.voIP]
}
Make sure you conform to the delegate and implement the 'didUpdate' and 'didReceiveIncomingPush' functions. In one of the callbacks we'll get the token:
func pushRegistry(_ registry: PKPushRegistry, didUpdate pushCredentials: PKPushCredentials, for type: PKPushType) {
    let parts = pushCredentials.token.map { String(format: "%02.2hhx", $0) }
    let token = parts.joined()
    print("did update push credentials with token: \(token)")
}
The last callback that we want is the one that gets called when the push notification is delivered to the device:
func pushRegistry(_ registry: PKPushRegistry, didReceiveIncomingPushWith payload: PKPushPayload, for type: PKPushType, completion: @escaping () -> Void) {
    if let callerID = payload.dictionaryPayload["callerID"] as? String {
        self.incommingCall(from: callerID)
    }
}
Obviously, the payload will depend on your app. Here we're just parsing a simple string that we'll display on the UI.
Test It
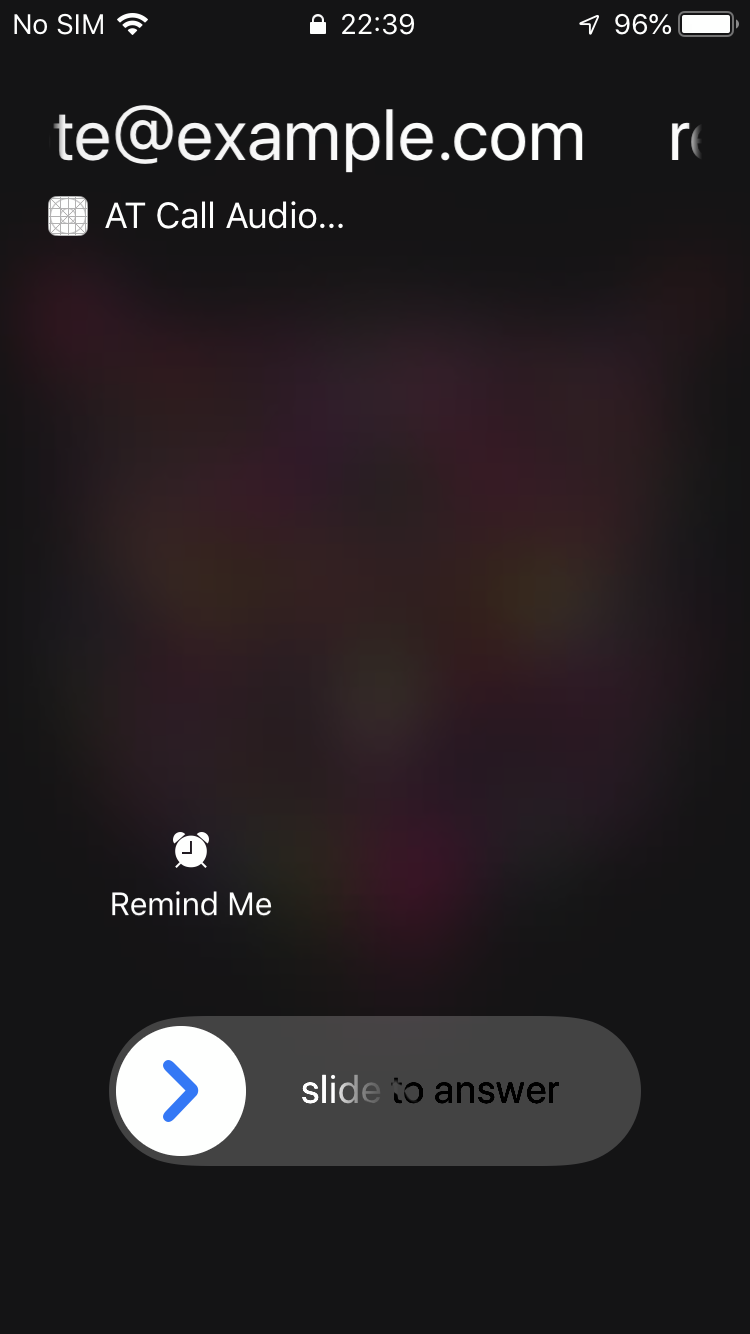
Build and run. You'll need to run it on a real device. When your app runs, make sure the token is printed in the console. Then type this in the terminal:curl -v -d '{"callerID":"remote@example.com"}' --http2 --cert voipCert.pem:YOUR_PASS https://api.development.push.apple.com/3/device/YOUR_PUSHKIT_TOKEN
You can get the token from the console and make sure you replace the password placeholder with your own password. If everything went well you should see the incoming call UI:
 Try killing the app, locking the phone and sending the push again. It should work:
 That was pretty simple, wasn't it :)
Try killing the app, locking the phone and sending the push again. It should work:
That was pretty simple, wasn't it :)