Using ResearchKit
Dejan Agostini
ResearchKit is a different kind of a framework. It's used in apps that are conducting medical research. Apple has made this framework completely open source and anyone can contribute to it. It's available on GitHub if you want to check it out. In this article we'll go over the main features of ResearchKit on a demo project and we'll get you started using ResearchKit.
Basic Components
In most medical researches you'll see three main things. You will read and sign a document that informs you about the research and that contains all sorts of legal stuff. After the legal tidbits you'll probably fill out a survey and perform some tasks. These are the basic components of medical research that ResearchKit offers to you:- Gathering Consent
- Surveys
- Active Tasks
Project Setup
The easiest way to set up ResearchKit is to use cocoapods. If you go through the official documentation you won't find any mention of cocoapods (or at least I couldn't find one easily), but ResearchKit is available on cocoapods. Before you jump in and install it, you'll have to install Git-LFS first. It's just one terminal command that you need to run and you only need to do it once on your machine. Download the command line extension and run the command in your terminal:git lfs install
Now you can add the pod to the podfile:
pod 'ResearchKit'
Go ahead and run 'pod install'. You should be all set :)
Tasks And Steps
Everything in ResearchKit is a task. Tasks can contain one or more steps. And tasks are presented on the screen by a custom tasks view controller. You have a lot of different tasks and steps, but the principle is always the same. Construct your task with some steps and present it to the user. Let's start with a simple task, the consent.Consents
A consent is a document that a test subject has to read and sign. Most of them follow the same document structure with the same sections. Apple has made this really easy to implement and if you implement the document sections in the order Apple has pre set, you will get some fancy animations when transitioning between document sections. Our consent document will be a simple task that will have two steps. The visual consent step and the consent review step. Before working on these two, let's make our lives a bit easier and our code a bit cleaner with some simple extensions:extension ORKConsentSection {
public convenience init(type: ORKConsentSectionType, summary: String?, content: String?) {
self.init(type: type)
self.summary = summary
self.content = content
}
}
extension ORKConsentReviewStep {
public convenience init(identifier: String, document: ORKConsentDocument, text: String?, reason: String?) {
guard let signature = document.signatures?.first else {
fatalError("Cannot create a review step without a signature")
}
self.init(identifier: identifier, signature: signature, in: document)
self.text = text
self.reasonForConsent = reason
}
}
Now we can create our consent document:
class ATConsentTask: ORKTaskFactory {
    func makeTask() -> ORKTask {

        let consentDocument = ORKConsentDocument()
        consentDocument.title = "Study Consent"
        consentDocument.sections = [
            ORKConsentSection(type: .overview,
                              summary: "Random study",
                              content: "Some general info about the study"),
            ORKConsentSection(type: .dataGathering,
                              summary: "We'll collect some data",
                              content: "We're going to collect some data from you for scientific purposes"),
            ORKConsentSection(type: .privacy,
                              summary: "Your privacy is important to us",
                              content: "We'll protect your privacy and won't sell your data"),
            ORKConsentSection(type: .dataUse,
                              summary: "We need some data",
                              content: "Your data will only be used for research purposes"),
            ORKConsentSection(type: .timeCommitment,
                              summary: "You'll spend some time",
                              content: "You will spend roughly 15 minutes a week"),
            ORKConsentSection(type: .studySurvey,
                              summary: "Study survey",
                              content: "You'll be filling out some surveys"),
            ORKConsentSection(type: .studyTasks,
                              summary: "Study tasks",
                              content: "Some of the tasks might require you to move around"),
            ORKConsentSection(type: .withdrawing,
                              summary: "Withdrawing",
                              content: "You can always leave the survey")
        ]
        consentDocument.addSignature(ORKConsentSignature(forPersonWithTitle: nil, dateFormatString: nil, identifier: "ParticipantSignature"))

        return ORKOrderedTask(identifier: "consentTaskID",
                              steps: [
                                ORKVisualConsentStep(identifier: "visualConsentStepID",
                                                     document: consentDocument),
                                ORKConsentReviewStep(identifier: "consentReviewStepID",
                                                     document: consentDocument,
                                                     text: "Review",
                                                     reason: "Review the consent")
            ])
    }
}
If you arrange your document sections in this order you'll get some nice animations, we'll show them in a bit. The consent section is a view that will be displayed with the info provided. A thing to note is that in the consent review step the document will be displayed in full. In the visual consent step only the 'summary' will be visible on the screen, your users will have to select a link to see the details.
At the end of the document we add a signature, which is also a functionality provided to you out of the box. The last thing that we have to do is create the ordered task with our two steps and present the task using the 'ORKTaskViewController'.
private func showTask(_ task: ORKTask) {
    let taskViewController = ORKTaskViewController(task: task, taskRun: nil)
    taskViewController.delegate = self
    present(taskViewController, animated: true, completion: nil)
}
This is how our consent task looks like in action with the two steps:
And here you can see that nice animation that we've talked about. At the end of the flow, your user will give their name and sign the document. We already mentioned that ResearchKit is not handling the data persistence. So it's up to you to handle that data.
To handle the data, we have a convenient delegate callback:
extension ViewController: ORKTaskViewControllerDelegate {
    func taskViewController(_ taskViewController: ORKTaskViewController, didFinishWith reason: ORKTaskViewControllerFinishReason, error: Error?) {

        print("Got the results: \(taskViewController.result)")

        dismiss(animated: true, completion: nil)
    }
}
You can access all the data for this task, and all the others that we'll implement, by using the '.result' property of the passed in ORKTaskViewController.
Surveys
Surveys are also very simple and versatile. We're also going to create a few steps and add them to a task. Just like we did with the consents, we'll create a few extensions to make our lives a bit easier:extension ORKTextAnswerFormat {
public convenience init(maxLength: Int, multiLine: Bool) {
self.init(maximumLength: maxLength)
self.multipleLines = multiLine
}
}
extension ORKCompletionStep {
public convenience init(identifier: String, title: String, text: String) {
self.init(identifier: identifier)
self.title = title
self.text = text
}
}
Let's construct our survey task:
class ATSurveyTask: ORKTaskFactory {
func makeTask() -> ORKTask {
let instructions = ORKInstructionStep(identifier: "surveyInsteuctions")
instructions.title = "We'll ask you a few questions"
instructions.text = "Here are the instructions on how to answer them"
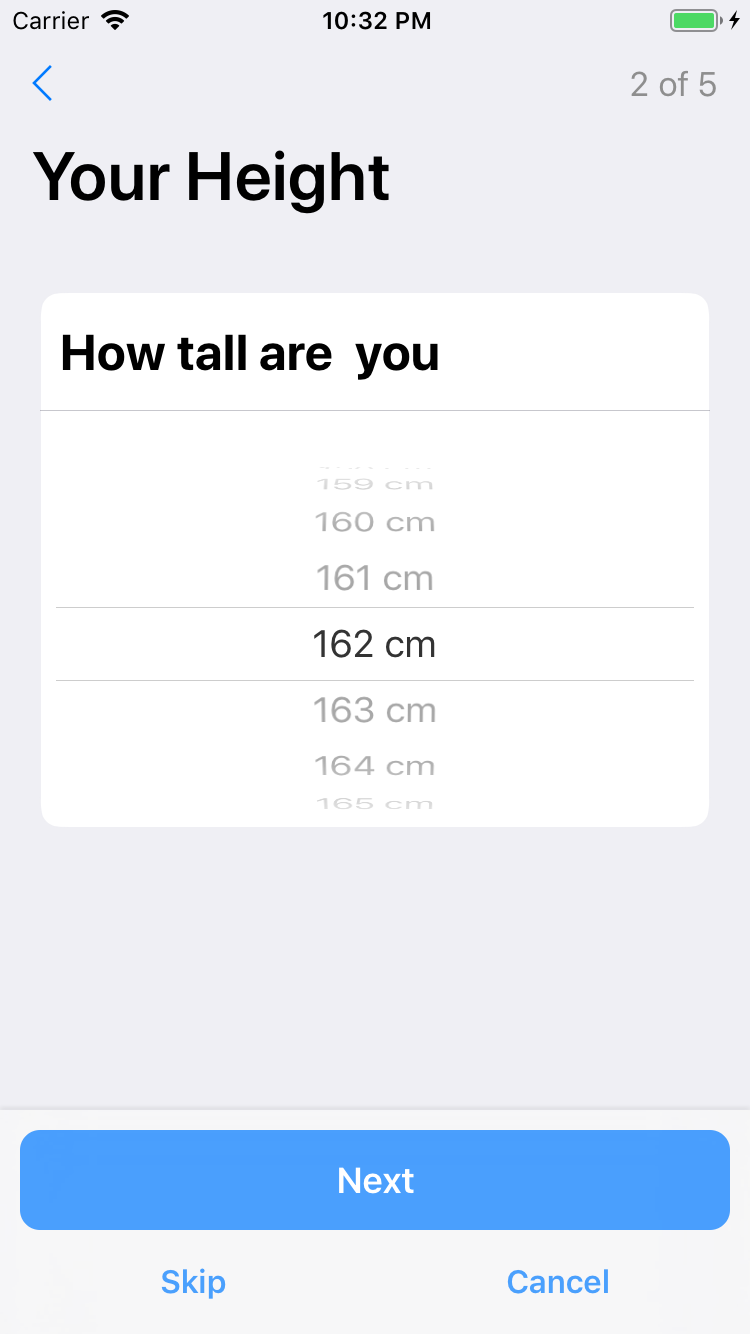
let heightQuestion = ORKQuestionStep(identifier: "heightQuestionStep",
title: "Your Height",
question: "How tall are you",
answer: ORKHeightAnswerFormat(measurementSystem: .metric))
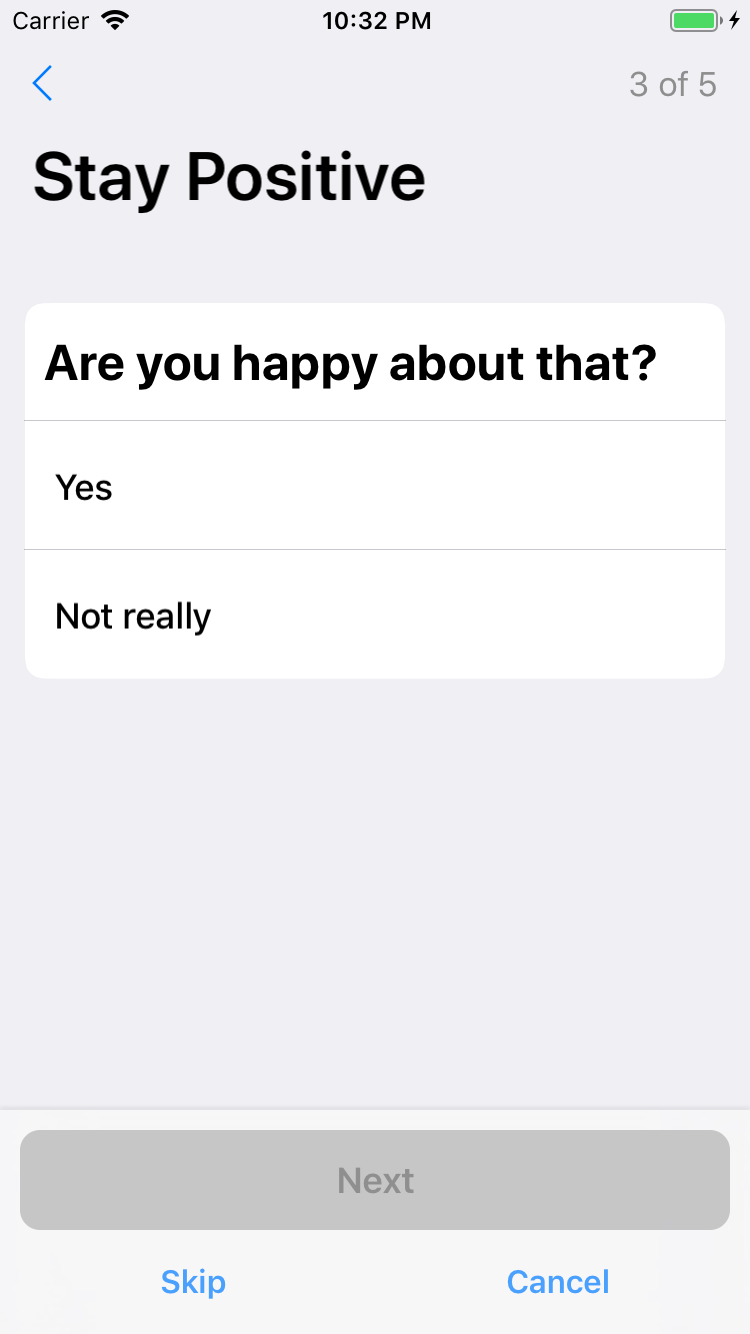
let happyQuestion = ORKQuestionStep(identifier: "happyQuestionStep",
title: "Stay Positive",
question: "Are you happy about that?",
answer: ORKTextChoiceAnswerFormat(style: .singleChoice,
textChoices: [
ORKTextChoice(text: "Yes", value: NSNumber(integerLiteral: 0)),
ORKTextChoice(text: "Not really", value: NSNumber(integerLiteral: 1))]))
let explanationStep = ORKQuestionStep(identifier: "explanationStep",
title: "Why?",
question: "Explain why in a few words...",
answer: ORKTextAnswerFormat(maxLength: 288, multiLine: true))
let completion = ORKCompletionStep(identifier: "completionStep",
title: "Thanks",
text: "Thanks for taking part in this really important survey.")
return ORKOrderedTask.init(identifier: "surveyTaskID",
steps: [
instructions,
heightQuestion,
happyQuestion,
explanationStep,
completion])
}
}
The steps are very simple. The answers are more interesting. If you take a closer look, we have loads of different answer types available. Displayed here in the example are just a few, like your standard multiple choice answer, text answer and not so standard height picker :)
 All the steps we've created so far are skippable, but you can control this by setting the '.optional' property to false on the steps you create.
Just like with the consent task, the delegate method will get called with the results of the survey and you can save the data where ever you want.
All the steps we've created so far are skippable, but you can control this by setting the '.optional' property to false on the steps you create.
Just like with the consent task, the delegate method will get called with the results of the survey and you can save the data where ever you want.
All the steps we've created so far are skippable, but you can control this by setting the '.optional' property to false on the steps you create.
Just like with the consent task, the delegate method will get called with the results of the survey and you can save the data where ever you want.
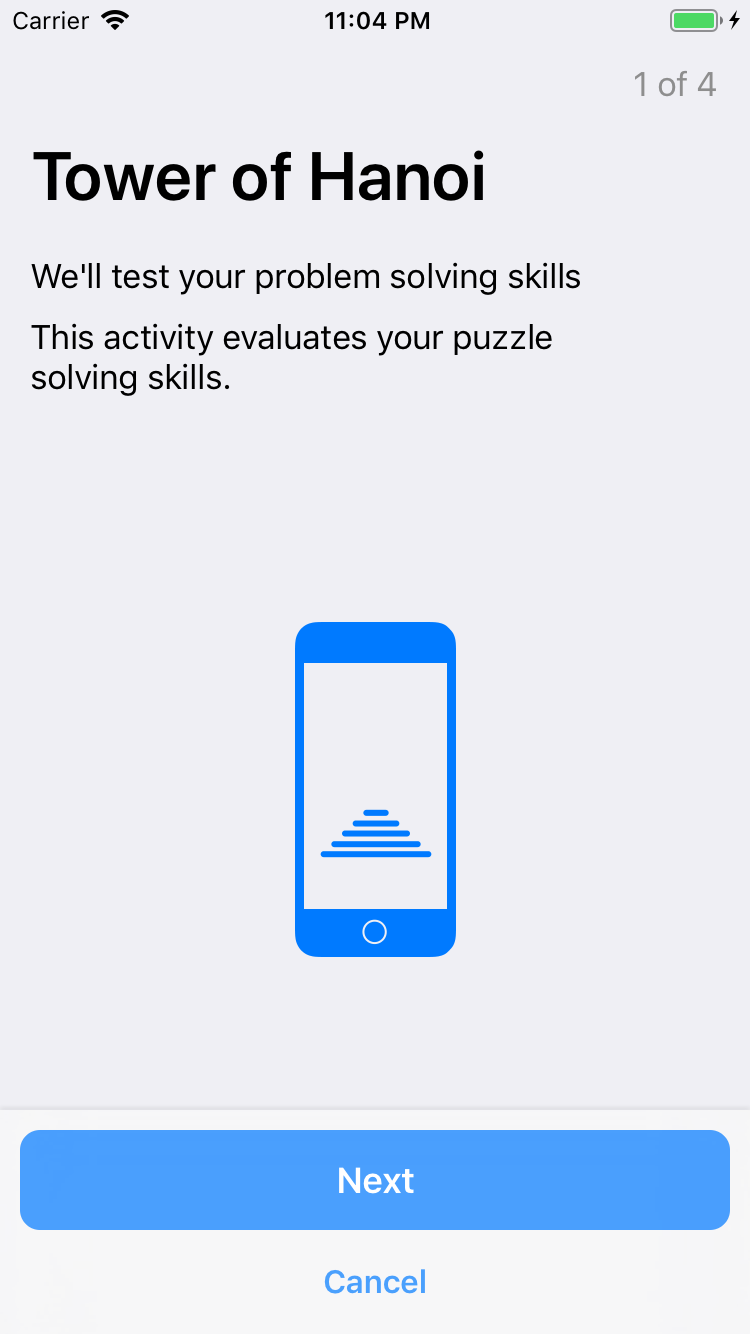
Active Tasks
The tasks we've covered so far are pretty simple. They're just different kinds of forms that the user fills out. Active tasks are a more interactive part of ResearchKit. There's lots of active tasks your users can perform and they measure a range of things. From measuring hearing and activity to measuring cognitive response and reflexes. In our example we'll only cover one of them, the well-known tower of Hanoi:@IBAction func startActiveTask(_ sender: Any) {
let activeTask = ORKOrderedTask.towerOfHanoiTask(withIdentifier: "towerOfHanoi",
intendedUseDescription: "We'll test your problem solving skills",
numberOfDisks: 3,
options: [])
showTask(activeTask)
}
Yes, it's that simple :) This is how our task will look like when presented to the user:
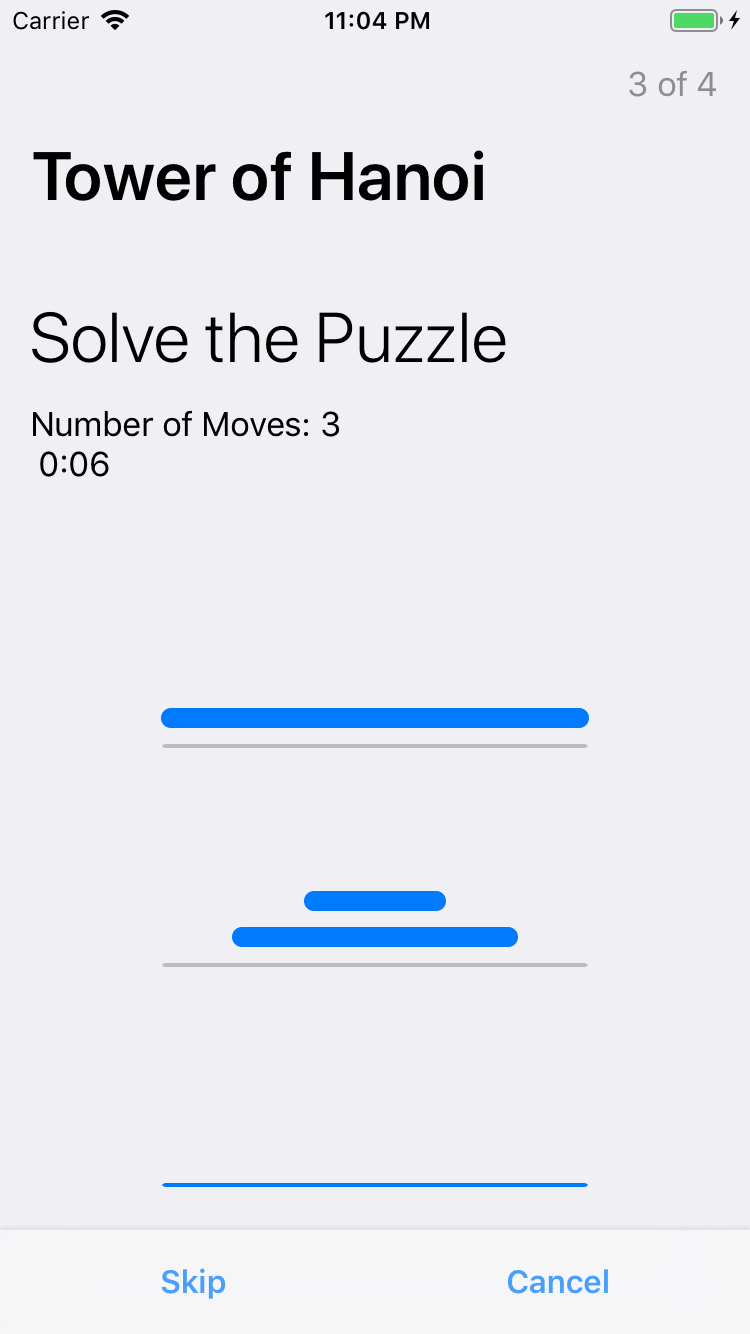 Just like with the other tasks, you'll get the results in the delegate callback. For the tower of Hanoi task you'll even get the path the user took to solve the puzzle. Pretty neat :)
Just like with the other tasks, you'll get the results in the delegate callback. For the tower of Hanoi task you'll even get the path the user took to solve the puzzle. Pretty neat :)