Detecting Directed Cycles In Edge Weighted Digraphs
Dejan Agostini
Edge weighted digraphs can be used for a large number of things. In some cases we want to know if there's a directed cycle between the nodes (or vertices). For example, if we're working on a scheduling app, we would be interested to know if there's a cycle on the graph. In this article we'll talk about detecting directed cycles in edge weighted digraphs and we'll implement the solution in swift.
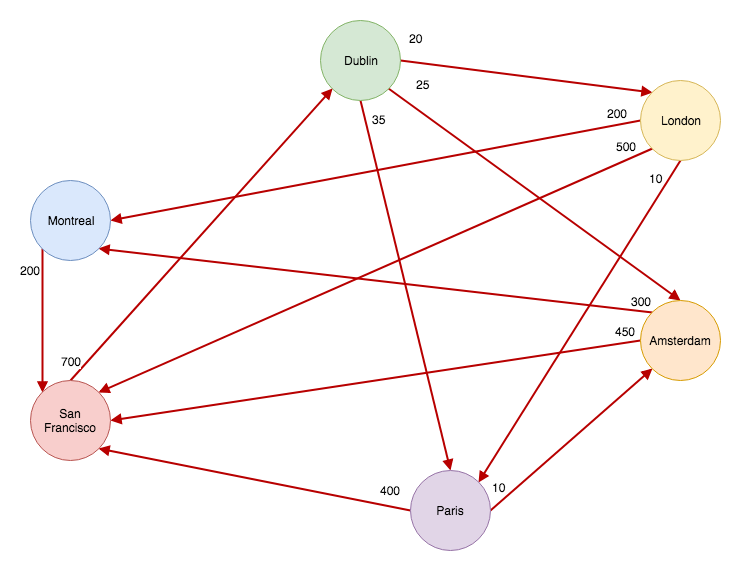 A directed cycle is a path that can lead you to the vertex you started the path from. Look at the graph above. There are many cycles on that graph, if you travel from Dublin to Paris, then to San Francisco, you can end up in Dublin again. This is a directed cycle. The graph above is representing airports and directed cycles are not a problem in this case, in fact, you would expect to see them. Think: return flights :)
In some cases, directed cycles are not desirable. And if you find a directed cycle on a graph it would mean something is wrong. A good example would be software development. Imagine you're building a piece of software and your software project consists of four modules. Some modules have a dependency on other modules and you can't start working on them before you finish working on those dependent modules. We could display this on a graph like this one:
A directed cycle is a path that can lead you to the vertex you started the path from. Look at the graph above. There are many cycles on that graph, if you travel from Dublin to Paris, then to San Francisco, you can end up in Dublin again. This is a directed cycle. The graph above is representing airports and directed cycles are not a problem in this case, in fact, you would expect to see them. Think: return flights :)
In some cases, directed cycles are not desirable. And if you find a directed cycle on a graph it would mean something is wrong. A good example would be software development. Imagine you're building a piece of software and your software project consists of four modules. Some modules have a dependency on other modules and you can't start working on them before you finish working on those dependent modules. We could display this on a graph like this one:
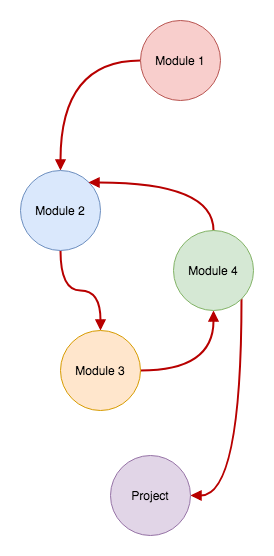 As you can see from the graph above, this project will never get finished. 'Module 2' has a dependency on 'Module 4'. This creates a dependency cycle:
 Modules 2, 3 and 4 are creating a cycle. In a simple diagram like this one, it's quite easy to detect a cycle. But imagine you're working on a complex system that consist's of hundreds of modules. Detecting a cycle in a system like that one could prove to be challenging.
In our example all we want to know is if a graph has a cycle or not. If there's a cycle, we know that the project can't be finished. Next, we'll implement this algorithm...
Modules 2, 3 and 4 are creating a cycle. In a simple diagram like this one, it's quite easy to detect a cycle. But imagine you're working on a complex system that consist's of hundreds of modules. Detecting a cycle in a system like that one could prove to be challenging.
In our example all we want to know is if a graph has a cycle or not. If there's a cycle, we know that the project can't be finished. Next, we'll implement this algorithm...
Directed Cycle
A few weeks ago we talked about edge weighted digraphs in swift. In that article we've used airports as our graph example. Just to refresh your memory, this is the graph we used as an example:
A directed cycle is a path that can lead you to the vertex you started the path from. Look at the graph above. There are many cycles on that graph, if you travel from Dublin to Paris, then to San Francisco, you can end up in Dublin again. This is a directed cycle. The graph above is representing airports and directed cycles are not a problem in this case, in fact, you would expect to see them. Think: return flights :)
In some cases, directed cycles are not desirable. And if you find a directed cycle on a graph it would mean something is wrong. A good example would be software development. Imagine you're building a piece of software and your software project consists of four modules. Some modules have a dependency on other modules and you can't start working on them before you finish working on those dependent modules. We could display this on a graph like this one:
As you can see from the graph above, this project will never get finished. 'Module 2' has a dependency on 'Module 4'. This creates a dependency cycle:
Modules 2, 3 and 4 are creating a cycle. In a simple diagram like this one, it's quite easy to detect a cycle. But imagine you're working on a complex system that consist's of hundreds of modules. Detecting a cycle in a system like that one could prove to be challenging.
In our example all we want to know is if a graph has a cycle or not. If there's a cycle, we know that the project can't be finished. Next, we'll implement this algorithm...
Implementation
We'll build on top of the project that we used for the Dijkstra's algorithm and for edge weighted digraphs. You can find the project on GitLab. We'll need a stack as well. We've talked about how to implement a stack using a linked list over a year ago. We slightly modified that example, here's the implementation:public class ATStack<Element: Equatable> {
class Node<Element> {
var item: Element
var next: Node?
init(withItem item: Element) {
self.item = item
}
}
private var head: Node<Element>?
private var count: Int = 0
public var isEmpty: Bool {
return head == nil
}
public var size: Int {
return count
}
public func push(item: Element) {
let oldHead = head
head = Node(withItem: item)
head?.next = oldHead
count += 1
}
public func pop() -> Element? {
let item = head?.item
head = head?.next
count -= 1
return item
}
public func peek() -> Element? {
return head?.item
}
public func contains(_ element: Element) -> Bool {
var current = head
while (current != nil) {
if current?.item == element {
return true
}
current = current?.next
}
return false
}
public func allElements() -> [Element] {
var result: [Element] = []
var current = head
while current != nil {
result.append(current!.item)
current = current?.next
}
return result
}
}
It's actually quite easy to detect a cycle on a graph. We'll be using a depth first search to traverse our graph. All we have to do is keep track of the current 'path', to be more precise, we need to keep track of our recursion stack. Take a look at the example on the diagram above. If we start traversing our graph from 'Module 1', there's only one path that we can take. If we keep adding the vertices on the stack as we're visiting them, we'll eventually try to add a vertex into our recursion stack for the second time. In the diagram above, that would be 'Module 2'. As soon as that happens we know that we have a cycle. This is exactly how our algorithm is going to work.
The Class
In our class, we'll keep an array of visited vertices and an array of reachable destinations. We'll use the array of reachable destinations to construct our cycle if we have one. Here are the instance variables that we'll be using:private var visitedVertices: [Vertex<Element>] = []
private var destinations: [Destination<Element>] = []
private var cycleStack: ATStack<Vertex<Element>>?
private var recursionStack: ATStack<Vertex<Element>> = ATStack()
'recursionStack' will be used to push and pop vertices onto the stack as we're performing the depth first search. We added a function to our stack implementation that checks if an object is already in the stack. We'll use this to check if we're entering a cycle:
private func isVisited(_ vertex: Vertex<Element>) -> Bool {
    return visitedVertices.contains(vertex)
}
'cycleStack' is a simple stack that will contain the vertices that are closing the cycle loop:
public var hasCycle: Bool {
	return cycleStack != nil
}

public var cycle: [Vertex<Element>] {
    return cycleStack?.allElements().reversed() ?? []
}
In the constructor we'll fill our 'destinations' array and start the algorithm:
init(_ graph: EdgeWeightedDigraph<Element>) {

	graph.vertices.forEach { self.destinations.append(Destination($0)) }

	graph.vertices.forEach { vertex in
		if self.isVisited(vertex) == false {
			self.depthFirstSearch(vertex)
		}
	}
}
Now it's time to move on to the actual algorithm...
The Algorithm
As you can see, the algorithm is quite simple:private func depthFirstSearch(_ vertex: Vertex<Element>) {
self.recursionStack.push(item: vertex)
self.visitedVertices.append(vertex)
vertex.adjacentEdges.forEach { (edge) in
let edgeDestination = edge.destination
let nextDestination = self.destination(for: edgeDestination)
if self.hasCycle {
return
} else if self.isVisited(edgeDestination) == false {
nextDestination.previousVertex = edge.source
self.depthFirstSearch(edgeDestination)
} else if self.recursionStack.contains(edgeDestination) == true {
self.cycleStack = ATStack()
self.cycleStack?.push(item: vertex)
var currentDestination = destination(for: vertex)
while let previousVertex = currentDestination.previousVertex {
self.cycleStack?.push(item: previousVertex)
if previousVertex == edgeDestination {
break
}
currentDestination = destination(for: previousVertex)
}
self.cycleStack?.push(item: vertex)
}
}
_ = self.recursionStack.pop()
}
We push a vertex on the recursion stack and mark it as visited by adding it to the 'visitedVertices' array. For every adjacent edge in the vertex we check if the destination vertex has been visited. If not, we'll do a recursive call with the destination vertex.
If our recursion stack contains the destination, then we have our cycle. Next, we'll create our cycle stack and backtrack from the current vertex all the way to back to the current vertex again. Thus completing the cycle. We push all the vertices that we encounter while backtracking onto the cycle stack.
All the subsequent calls to 'depthFirstSearch' will return early when the first 'if' branch gets executed (because now we have a cycle).
It's important to pop the vertex off the stack at the bottom of the function. If you need some help trying to figure out recursion, this article on binary search trees has a section that explains recursion.
And that's it. We can now detect cycles in any directed graph.
Test It Out
Let's quickly test this out by implementing a graph from our example diagram:let module1 = Vertex("Module 1")
let module2 = Vertex("Module 2")
let module3 = Vertex("Module 3")
let module4 = Vertex("Module 4")
let project = Vertex("Project")
let projectGraph = EdgeWeightedDigraph<String>()
projectGraph.addVertex(module1)
projectGraph.addVertex(module2)
projectGraph.addVertex(module3)
projectGraph.addVertex(module4)
projectGraph.addVertex(project)
projectGraph.addEdge(source: module1, destination: module2, weight: 10)
projectGraph.addEdge(source: module2, destination: module3, weight: 40)
projectGraph.addEdge(source: module3, destination: module4, weight: 15)
projectGraph.addEdge(source: module4, destination: module2, weight: 25)
projectGraph.addEdge(source: module4, destination: project, weight: 5)
let ewCycle = EdgeWeightedDirectedCycle(projectGraph)
print("EW Cycle: ", ewCycle.cycle)
We create our vertices and give some random weights to the edges. After which we initialise our class with the newly created graph and check for the cycle, if there is any.
EW Cycle:  [
[Vertex]: Module 4 | [Adjacent Edges]: [[
[Edge] [Destination]: Module 2 - [Weight]: 25.0,
[Edge] [Destination]: Project - [Weight]: 5.0]],
[Vertex]: Module 3 | [Adjacent Edges]: [[
[Edge] [Destination]: Module 4 - [Weight]: 15.0]],
[Vertex]: Module 2 | [Adjacent Edges]: [[
[Edge] [Destination]: Module 3 - [Weight]: 40.0]],
[Vertex]: Module 4 | [Adjacent Edges]: [[
[Edge] [Destination]: Module 2 - [Weight]: 25.0,
[Edge] [Destination]: Project - [Weight]: 5.0]]]
In the console output we can clearly see the cycle. It starts with 'Module 4' and ends with 'Module 4'.
We can run our new cycle detector on the same graph that we used for Dijkstra's algorithm. If we do that we'll see that all the vertices on the graph are a part of a cycle:
EW Cycle:  [
[Vertex]: San Francisco | [Adjacent Edges]: [[
[Edge] [Destination]: Dublin - [Weight]: 700.0]],
[Vertex]: Montreal | [Adjacent Edges]: [[
[Edge] [Destination]: San Francisco - [Weight]: 200.0]],
[Vertex]: Amsterdam | [Adjacent Edges]: [[
[Edge] [Destination]: Montreal - [Weight]: 300.0,
[Edge] [Destination]: San Francisco - [Weight]: 450.0]],
[Vertex]: Paris | [Adjacent Edges]: [[
[Edge] [Destination]: Amsterdam - [Weight]: 10.0,
[Edge] [Destination]: San Francisco - [Weight]: 400.0]],
[Vertex]: London | [Adjacent Edges]: [[
[Edge] [Destination]: Paris - [Weight]: 10.0,
[Edge] [Destination]: Montreal - [Weight]: 200.0,
[Edge] [Destination]: San Francisco - [Weight]: 500.0]],
[Vertex]: Dublin | [Adjacent Edges]: [[
[Edge] [Destination]: London - [Weight]: 20.0,
[Edge] [Destination]: Amsterdam - [Weight]: 25.0,
[Edge] [Destination]: Paris - [Weight]: 35.0]],
[Vertex]: San Francisco | [Adjacent Edges]: [[
[Edge] [Destination]: Dublin - [Weight]: 700.0]]]