Reading Barcodes And QR Codes With AVFoundation
Dejan Agostini

There's a really simple way to read barcodes, QR codes and all sorts of machine readable code by using nothing more than AVFoundation. In this quick article we'll be reading barcodes and QR codes with AVFoundation in no time. Let's get started.
 Feel free to lay out the UI in any way that works for you.
You can see the red rectangle surrounding the QR code. You get this pretty much for free, we'll come to that in a bit.
Before we jump into the code, go to your Info.plist file and add a value for a key 'NSCameraUsageDescription' otherwise you might be surprised :)
Feel free to lay out the UI in any way that works for you.
You can see the red rectangle surrounding the QR code. You get this pretty much for free, we'll come to that in a bit.
Before we jump into the code, go to your Info.plist file and add a value for a key 'NSCameraUsageDescription' otherwise you might be surprised :)
 Time for some code...
The App
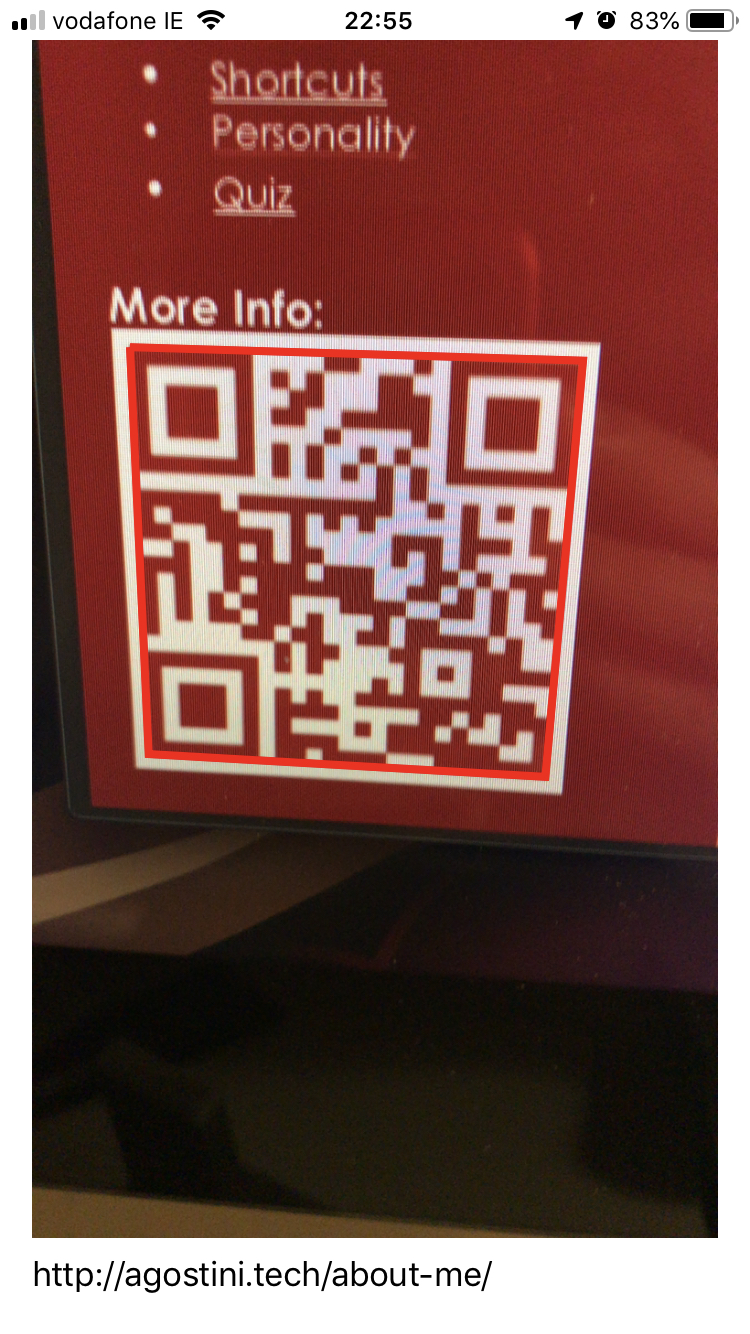
We'll build a simple app that will scan the code, draw a rectangle around it and display the information associated with the code. The app will be pretty simple in the end. This is how our UI will look like:
Feel free to lay out the UI in any way that works for you.
You can see the red rectangle surrounding the QR code. You get this pretty much for free, we'll come to that in a bit.
Before we jump into the code, go to your Info.plist file and add a value for a key 'NSCameraUsageDescription' otherwise you might be surprised :)
Time for some code...
Some Code
First off, just drag two IBOutlets. One for the container view where we'll add our video layer and the other one for the label. Don't forget to import the AVFoundation :) If you're new to AVFoundation you can find loads of resources here. But, for the purposes of this article, you only need to know some basics. We'll only work with the AVCaptureSession. Your capture session can have inputs (cameras, microphone) and outputs (images, video, metadata). The purpose of the capture session is to coordinate the data flow from inputs to outputs. Now we know we'll need a few things:- capture session
- video input
- metadata output
- video preview
- draw the rectangle
Setting Up The Session
Setting up the session is pretty simple. Check out this code:private var captureSession: AVCaptureSession = AVCaptureSession()
private let sessionQueue = DispatchQueue(label: "Capture Session Queue")
private func setupCaptureSession() {
sessionQueue.sync {
self.captureSession.beginConfiguration()
let output = AVCaptureMetadataOutput()
if let device = AVCaptureDevice.default(for: .video),
let input = try? AVCaptureDeviceInput(device: device),
self.captureSession.canAddInput(input) && self.captureSession.canAddOutput(output) {
self.captureSession.addInput(input)
self.captureSession.addOutput(output)
output.metadataObjectTypes = [
.aztec,
.code39,
.code39Mod43,
.code93,
.code39Mod43,
.code128,
.dataMatrix,
.ean8,
.ean13,
.interleaved2of5,
.itf14,
.interleaved2of5,
.pdf417,
.qr,
.upce
]
output.setMetadataObjectsDelegate(self, queue: DispatchQueue.main)
}
self.captureSession.commitConfiguration()
DispatchQueue.main.async {
self.setupPreviewLayer(session: self.captureSession)
self.setupBoundingBox()
}
self.captureSession.startRunning()
}
}
Because starting the session is a blocking call, and we don't want to block our main thread, we're using a queue to setup our session. All of our session configuration needs to be between 'beginConfiguration' and 'commitConfiguration' function calls.
We know we want to scan machine readable code so our output will be the 'AVCaptureMedatadaOutput'. Next thing we'll be needing is the output. Obviously, we'll use the camera. So we simply ask for the default video device, which would be the normal camera on the iPhone. After creating our input, we add the input and the output to the session.
On the output object that we created we can set the metadata object types. These are all the different barcodes and QR codes that we want scanned. Maybe you won't need all of them, so just add the ones that you want. After setting the types, we set ourselves as the delegate and tell the output to call the delegate functions on the main queue.
We're finished with the configuration, so we can commit it. After committing it we finish setting up the UI and start our capture session.
The Preview And The Bounding Box
If you remember, we created a container view that will display our camera output. Adding your camera output to a view is easier than it sounds. You can do it in a few lines of code:private func setupPreviewLayer(session: AVCaptureSession) {
previewLayer = AVCaptureVideoPreviewLayer(session: session)
previewLayer.frame = previewContainer.layer.bounds
previewLayer.videoGravity = .resizeAspectFill
previewContainer.layer.addSublayer(previewLayer)
}
AVFoundation comes with a ready-made layer 'AVCaptureVideoPreviewLayer' that will display the camera output, we just set a few properties on it and add it as a sublayer to our container.
Now we come down to the bounding box. What we'll do is create another layer and draw our box on it. We'll also add this new layer to our container and display it over the video capture layer. Creating this layer is simple:
private var boundingBox = CAShapeLayer()
private func setupBoundingBox() {
    boundingBox.frame = previewContainer.layer.bounds
    boundingBox.strokeColor = UIColor.red.cgColor
    boundingBox.lineWidth = 4.0
    boundingBox.fillColor = UIColor.clear.cgColor

    previewContainer.layer.addSublayer(boundingBox)
}
If you never worked with layers before, stroke color is the color of the lines that you'll draw on the layer. Line width is self-explanatory :) Without getting into too much detail, fill color is the color of the area inside your lines. What we said here is that we want a transparent rectangle with red lines. Now we need to draw the actual rectangle.
Showing The Box
We'll be calling a function that's drawing a bounding box from our medatada output delegate callback. Here's the function for updating the bounding box:fileprivate func updateBoundingBox(_ points: [CGPoint]) {
guard let firstPoint = points.first else {
return
}
let path = UIBezierPath()
path.move(to: firstPoint)
var newPoints = points
newPoints.removeFirst()
newPoints.append(firstPoint)
newPoints.forEach { path.addLine(to: $0) }
boundingBox.path = path.cgPath
boundingBox.isHidden = false
}
All we're doing here is moving to the first point and then adding lines that will close the polygon with the original point. If you're new to drawing in layers think of it like drawing with a pencil. You move your pencil to a certain point on the paper and press down on it. Then you move to each points on your route. When you reach the last point you have to return to the starting point to finish the drawing.
Knowing all that, I hope that the function is a bit clearer now. When we're finished with our bezier path, we just add it to our bounding box layer and make sure it's visible.
Hiding The Box
Now, when the scanned code moves out of view we will hide the bounding box. We can do this very easily with a timer:private var resetTimer: Timer?
fileprivate func hideBoundingBox(after: Double) {
resetTimer?.invalidate()
resetTimer = Timer.scheduledTimer(withTimeInterval: TimeInterval() + after,
repeats: false) {
[weak self] (timer) in
self?.resetViews() }
}
private func resetViews() {
boundingBox.isHidden = true
resultsLabel.text = nil
}
In the code above, we schedule a timer that will fire after a certain delay and call a function that hides our bounding box and resets the label at the bottom of the screen.
The Data
The last thing we have to do is get the data. We'll implement the delegate function:extension ViewController: AVCaptureMetadataOutputObjectsDelegate {
func metadataOutput(_ output: AVCaptureMetadataOutput, didOutput metadataObjects: [AVMetadataObject], from connection: AVCaptureConnection) {
if let object = metadataObjects.first as? AVMetadataMachineReadableCodeObject {
self.resultsLabel.text = object.stringValue
guard let transformedObject = previewLayer.transformedMetadataObject(for: object) as? AVMetadataMachineReadableCodeObject else {
return
}
updateBoundingBox(transformedObject.corners)
hideBoundingBox(after: 0.25)
}
}
}
And every time the camera detects one of the codes you registered for it will call the delegate function. As you can see we're getting an array of 'AVMetadataObject' types. In this demo we'll assume we're scanning only one item at a time, so we're fetching the first item from the array and we try to cast it to 'AVMetadataMachineReadableCodeObject'.
Right after that, we'll set the object string value to our label. All that's left is to draw the bounding box around the code. The machine readable code object that we received already contains an array of points that represent the corners of the detected code object. But those values are relative. The values range from 0 to 1, so we have to convert them to the proper coordinate system. This is not difficult to do, but, fortunately, we have a function that will do this for us. That is the purpose of the 'transformedObject'. We simply call the function 'transformedMetadataObject' on our 'previewLayer' that will take in an object and convert all the points to the coordinate system of the layer.
After transforming our object, we call the function to update the bounding box and a function that will hide the box after a certain delay.