Automate PRs With Danger
Dejan Agostini

There are many tasks that can be automated when doing pull requests. And the more of these tasks we can automate the more time we'll have to focus on reviewing the actual code and focusing on the business logic. Danger is a tool that can help you out. It's a library that sits on your CI and performs checks on the code. In this article you'll learn how to automate PRs with Danger.
 You only need to select the 'public_repo' when creating a new token. Once you're finished, copy the code that GitHub will generate for you. You'll never see this code again, so make sure you save it somewhere for later.
 You can find the 'Environment Variables' section below, add your token there:
 Use 'DANGER_GITHUB_API_TOKEN' as the key, and make sure you enable the 'Display value in build log'.
One last thing we have to do is edit our '.travis.yml' file. Here's how the file looks like for this project:
Use 'DANGER_GITHUB_API_TOKEN' as the key, and make sure you enable the 'Display value in build log'.
One last thing we have to do is edit our '.travis.yml' file. Here's how the file looks like for this project:
Danger
Danger is designed to sit on your CI server and run checks. We've covered quite a few tools on this blog that can run locally and on the CI (linters, formatters...) You could run Danger locally if you really wanted to, but its home is your CI server. The best way to describe Danger is that it's a tool that's supposed to prevent accidents :) It can check your PR to make sure you included certain files, or even that you didn't accidentally commit some files. It can check for PR authors, maybe you're supposed to add a Jira ticket ID to your PR and you forgot... And a lot more. Perhaps the best advice is the one given by the authors of the tool. They advise us to start using Danger gradually, just check your PRs to make sure you included a changelog or check that your PR has a Jira ID, and build on top of that. You can create some pretty complex checks if you wanted to. We'll be using a public GitHub repo and a Travis CI to demo how to setup Danger... Let's get busy :)GitHub Setup
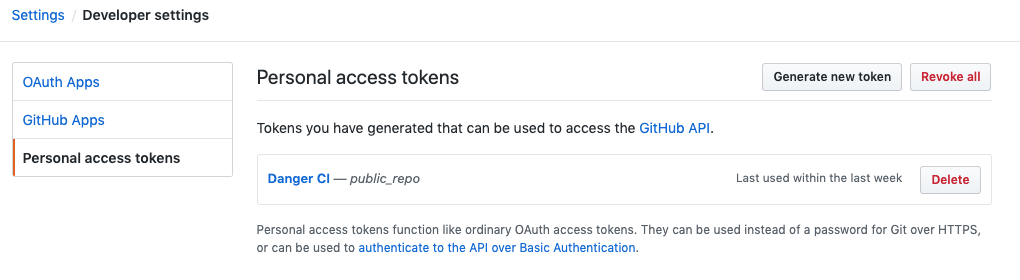
There's actually not much that you have to do on GitHub. The only thing we'll do is create a bot that we'll use to comment on the pull requests. Just to make things a bit more organized. Head over to GitHub and create a brand new account. Name the user what ever you want, usually having the word 'bot' in the name will avoid confusion. When you're done creating the account and verifying the email, you'll have to create a new access token. Just go to this page in your settings, and add a new token:
You only need to select the 'public_repo' when creating a new token. Once you're finished, copy the code that GitHub will generate for you. You'll never see this code again, so make sure you save it somewhere for later.
Travis CI Setup
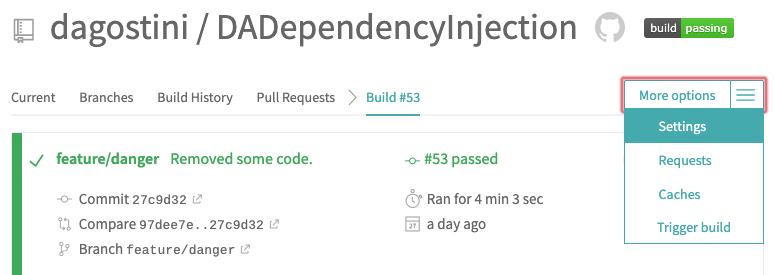
Let's add this token first. Go to Travis and open your repo. Open the settings:
You can find the 'Environment Variables' section below, add your token there:
Use 'DANGER_GITHUB_API_TOKEN' as the key, and make sure you enable the 'Display value in build log'.
One last thing we have to do is edit our '.travis.yml' file. Here's how the file looks like for this project:
language: swift
osx_image: xcode10.2
install:
    - brew install danger/tap/danger-swift
script:
    - danger-swift ci
    - xcodebuild test -project DADependencyInjection.xcodeproj -scheme DADependencyInjection -destination 'platform=iOS Simulator,name=iPhone 8,OS=12.2'
after_success:
    - bash <(curl -s https://codecov.io/bash)
You only need to add two lines; brew install, and danger-swift ci. They're pretty self explanatory, the first one installs danger on the VM image on Travis, the second one runs it :)
Local Install
If you're setting up Danger in a team, not everyone has to install it locally. Only the developer writing the rules needs to install it. It might be a good idea for every team member to have a local install, but it's not necessary for Danger to work. Installing it is pretty simple, using brew:brew install danger/tap/danger-swift
That should be it. Let's start using it...
Project Setup
Danger is not going to interfere with your project. What it's going to do is create a simple swift file in your project directory. Navigate to your project directory using terminal and type in:danger-swift edit
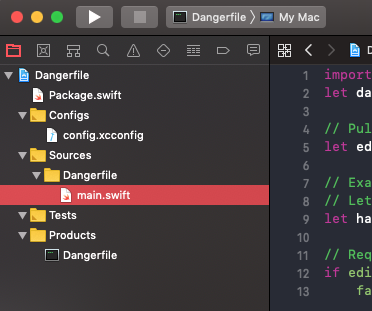
This will create your 'Dangerfile.swift' if it's not created already and start up Xcode where we'll edit it. Keep the terminal window open. When you're done with the file you'll save it and then you can come back to the terminal and hit 'Enter' like instructed:
 The 'edit' command should open your Xcode. Just navigate to your 'main.swift' file, and we'll write a few rules there:
 Don't forget, whey you're done editing, save the file and go back to terminal and press 'Enter'.
The 'edit' command should open your Xcode. Just navigate to your 'main.swift' file, and we'll write a few rules there:
Don't forget, whey you're done editing, save the file and go back to terminal and press 'Enter'.
Few Examples
Let's start with a default example from Danger:// Pull out the edited files
let editedFiles = danger.git.modifiedFiles + danger.git.createdFiles
let hasChangelogEntry = danger.git.modifiedFiles.contains("CHANGELOG.md")
// Example from danger
// Let people bail from the CHANGELOG check
let hasSkipChangelog = danger.github.pullRequest.body.contains("#no_changelog")
// Request for a CHANGELOG entry with each app change
if editedFiles.count > 0 && !hasChangelogEntry && !hasSkipChangelog {
fail("Please add a CHANGELOG entry for these changes. If you would like to skip this check, add `#no_changelog` to the PR body and re-run CI.")
}
You can find this example on their website. It will simply check if the pull request has a changelog file. But it will also allow for skipping the check if you add a hashtag into the PR body. You can see how easy it is to add custom checks. Let's add a few more:
let hasJiraID = danger.github.pullRequest.body.contains("DDI")
if !hasJiraID {
    fail("I couldn't find the Jira ticket ID! Did you forget to add it?")
}

let editedTravisFile = editedFiles.filter { $0.contains(".travis.yml") }
if !editedTravisFile.isEmpty {
    warn("Did you really mean to edit the travis.yml file?")
}

if danger.github.pullRequest.user.login == "dagostini" {
    warn("Not this guy again!")
}
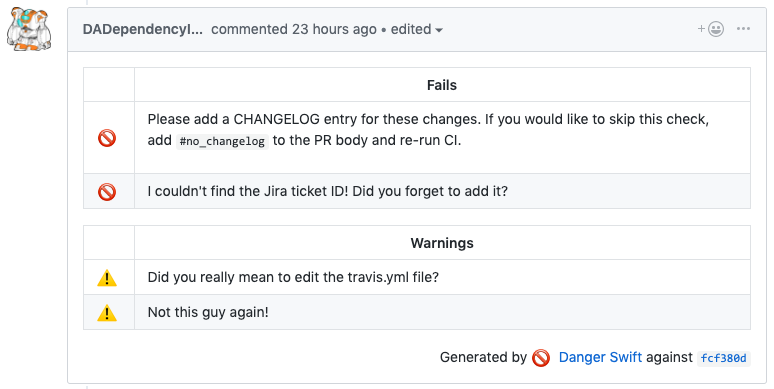
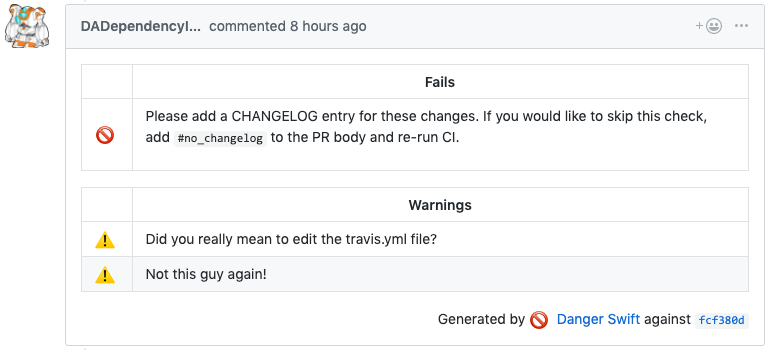
In these rules we'll be checking that the PR has a Jira ticket ID in the body of the PR. We're issuing a warning if we detect that a PR has modified the '.travis.yml' file. And a warning if we detect that the author is a certain someone :)
As you can see, the rules are simple to write, and you can write some pretty complex rules. Let's test this out...
 Nice. Now, if we delete this PR and add another one with the ticket ID:
 That one failure is now gone:
 That's pretty cool :) And it took just a few minutes to setup.
Testing It
Let's create a PR and 'forget' to add a Jira ticket ID and see what happens:
Nice. Now, if we delete this PR and add another one with the ticket ID:
That one failure is now gone:
That's pretty cool :) And it took just a few minutes to setup.