iOS Application Security Part 6–Reverse Engineering and Tampering Re-sign + Patching.
Liban Mohamud

Welcome to my 6th blog post on “iOS Application Security Testing Series”. You can find Part five here. In this article, we will look at application Re-sign and patching. In a previous blog post, we have looked at how we can hijack method implementations during runtime using Cycript or Frida.
The idea behind early instrumentation is to run commands and hook functions as the execution of the application starts (or as early as possible).
Examples of this might be when testing jailbreak detection, or when an API call that has its SSL certificate pinned is made on start-up. However, using Cycript or Frida for run-time manipulation is a bit of a pain as one must repeat the same process every time after the application restarts.
This is where patching the application is useful. Once a change has been made in the application’s binary, its permanent.
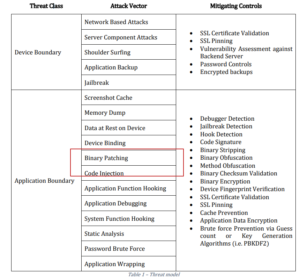
The Threat Assessment Process Overview (relevant to the application boundary)
 Thanks to Apple's confusing provisioning and code signing system, re-signing an app is more challenging than one would expect. iOS won't run an app unless you get the provisioning profile and code signature header exactly. This requires learning the concepts—certificate types, BundleIDs, application IDs, team identifiers, and how Apple's build tools connect them. Suffice it to say, getting the OS to run a binary that hasn't been built via the default method (Xcode) can be a daunting process.
I am sure many of you can learn things fast just by reading through a text but what I really like, is to get things explained in a visual way with boxes and arrows.
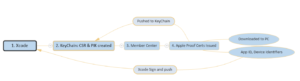
To understand how everything works, (from testers perspective follow the illustration steps).
Thanks to Apple's confusing provisioning and code signing system, re-signing an app is more challenging than one would expect. iOS won't run an app unless you get the provisioning profile and code signature header exactly. This requires learning the concepts—certificate types, BundleIDs, application IDs, team identifiers, and how Apple's build tools connect them. Suffice it to say, getting the OS to run a binary that hasn't been built via the default method (Xcode) can be a daunting process.
I am sure many of you can learn things fast just by reading through a text but what I really like, is to get things explained in a visual way with boxes and arrows.
To understand how everything works, (from testers perspective follow the illustration steps).
- Xcode will be installed and the Intermediate Certificate will be pushed into the Keychain
- Certificate Signing Request (CSR) will be created.
- Private Key will be generated along the CSR creation and stored in the Keychain
- CSR will be uploaded to the Member Center
- Apple will proof everything and issue the Certificate
- The certificate will be downloaded to your Computer
- The Certificate will be pushed into the Keychain and paired with the private key to form the Code Signing Identity
- The Provisioning Profile will be created using a Certificate, App ID and Device Identifiers and downloaded by Xcode
- Xcode will sign the App and push Provisioning Profiles onto the Device
- iOS will proof if everything is correctly configured. That means that the Provisioning Profile should include the Certificate you used to sign the App, your Device UDID and the correct App ID.
- Your App should be running now!
$ git clone https://github.com/alexzielenski/optool.git
$ cd optool/
$ git submodule update --init --recursive
$ xcodebuild
$ ln -s /build/Release/optool /usr/local/bin/optool
We'll also use ios-deploy, a tool that allows iOS apps to be deployed and debugged without Xcode:
$ git clone https://github.com/phonegap/ios-deploy.git
$ cd ios-deploy/
$ xcodebuild
$ cd build/Release
$ ./ios-deploy
$ ln -s /build/Release/ios-deploy /usr/local/bin/ios-deploy
The last line in Optool and ios-deploy creates a symbolic link and makes the executable available system-wide. Reload your shell to make the new commands available:
zsh: # . ~/.zshrc
bash: # . ~/.bashrc
To follow the examples below, you also need FridaGadget.dylib:
$ curl -O https://build.frida.re/frida/ios/lib/FridaGadget.dylib
Besides the tools listed above, we'll be using standard tools that come with macOS and Xcode. Make sure you have the Xcode command line developer tools installed.
Patching, Repackaging, and Re-Signing
Time to get serious! As you already know, IPA files are actually ZIP archives, so you can use any zip tool to unpack the archive. Copy FridaGadget.dylib into the app directory and use Optool to add a load command to the "UnCrackable Level 1" binary.
$ unzip UnCrackable_Level1.ipa
$ cp FridaGadget.dylib Payload/UnCrackable\ Level\ 1.app/
$ optool install -c load -p "@executable_path/FridaGadget.dylib"  -t Payload/UnCrackable\ Level\ 1.app/UnCrackable\ Level\ 1
Found FAT Header
Found thin header...
Found thin header...
Inserting a LC_LOAD_DYLIB command for architecture: arm
Successfully inserted a LC_LOAD_DYLIB command for arm
Inserting a LC_LOAD_DYLIB command for architecture: arm64
Successfully inserted a LC_LOAD_DYLIB command for arm64
Writing executable to Payload/UnCrackable Level 1.app/UnCrackable Level 1...
Of course, such blatant tampering invalidates the main executable's code signature, so this won't run on a non-jailbroken device. You'll need to replace the provisioning profile and sign both the main executable and FridaGadget.dylib with the certificate listed in the profile.
First, let's add our own provisioning profile to the package:
$ cp AwesomeRepackaging.mobileprovision Payload/UnCrackable\ Level\ 1.app/embedded.mobileprovision
Next, we need to make sure that the BundleID in Info.plist matches the one specified in the profile because the codesign tool will read the Bundle ID from Info.plist during signing; the wrong value will lead to an invalid signature.
$ /usr/libexec/PlistBuddy -c "Set :CFBundleIdentifier sg.vantagepoint.repackage" Payload/UnCrackable\ Level\ 1.app/Info.plist
Finally, we use the codesign tool to re-sign both binaries. Instead of "8004380F331DCA22CC1B47FB1A805890AE41C938," you need to use your signing identity, which you can output by executing the command security find-identity -p codesigning -v.
$ rm -rf Payload/UnCrackable\ Level\ 1.app/_CodeSignature
$ /usr/bin/codesign --force --sign 8004380F331DCA22CC1B47FB1A805890AE41C938  Payload/UnCrackable\ Level\ 1.app/FridaGadget.dylib
Payload/UnCrackable Level 1.app/FridaGadget.dylib: replacing existing signature
entitlements.plist is the file you created earlier, for your empty iOS project.
$ /usr/bin/codesign --force --sign 8004380F331DCA22CC1B47FB1A805890AE41C938 --entitlements entitlements.plist Payload/UnCrackable\ Level\ 1.app/UnCrackable\ Level\ 1
Payload/UnCrackable Level 1.app/UnCrackable Level 1: replacing existing signature
Patching React Native applications
If the React Native framework has been used for developing then the main application code is located in the file Payload/[APP].app/main.jsbundle. This file contains the JavaScript code. Most of the time, the JavaScript code in this file is minified. By using the tool JStillery a human-readable version of the file can be retried, allowing code analysis. The CLI version of JStillery or the local server should be preferred instead of using the online version as otherwise source code is sent and disclosed to a 3rd party.
At installation time, the application archive is unpacked into the folder /private/var/containers/Bundle/Application/[GUID]/[APP]. app thus the main application JavaScript file can be modified at this location.
To identify the exact location of the application folder, the tool ipainstaller can be used in this way:
-
-
- Use the command ipainstaller -ll to list the applications installed on the device and get the name of the target application from the printed list.
- Use the command ipainstaller -i [APP_NAME] to display the information about the target application including the installation and data folders locations.
- Take the path referenced at the line starting by Application.
-
-
-
- Move to the application folder location.
- Copy the content of the file Payload/[APP].app/main.jsbundle into a temporary file.
- Use JStillery to beautify and deobfuscate the content of the temporary file.
- Identify where the code should be patched in the temporary file and implement the changes.
- Put the patched code on a single line and copy it in the original Payload/[APP].app/main.jsbundle file.
- Close and restart the application
-
$ ios-deploy --debug --bundle Payload/UnCrackable\ Level\ 1.app/
If everything went well, the app should launch in debugging mode with lldb attached. Frida should now be able to attach to the app as well. You can verify this with the frida-ps command:
$ frida-ps -U
PID Name
--- ------
499 Gadget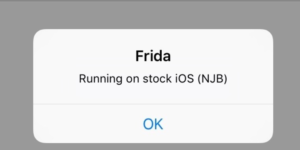 Troubleshooting
When something goes wrong (and it usually does), mismatches between the provisioning profile and code signing header are the most likely causes. Reading the official documentation helps you understand the code signing process. Apple's entitlement troubleshooting page is also a useful resource.
Automated Repackaging with Objection
Objection is a mobile runtime exploration toolkit based on Frida. One of the best things about Objection is that it works even with non-jailbroken devices. It does this by automating the process of app repackaging with FridaGadget.dylib. We have covered Objection in detail in a previous blog post, and you can find exhaustive documentation on the official wiki pages.
Troubleshooting
When something goes wrong (and it usually does), mismatches between the provisioning profile and code signing header are the most likely causes. Reading the official documentation helps you understand the code signing process. Apple's entitlement troubleshooting page is also a useful resource.
Automated Repackaging with Objection
Objection is a mobile runtime exploration toolkit based on Frida. One of the best things about Objection is that it works even with non-jailbroken devices. It does this by automating the process of app repackaging with FridaGadget.dylib. We have covered Objection in detail in a previous blog post, and you can find exhaustive documentation on the official wiki pages.