Enigma Machine was a famous cipher machine that the germans used during the World War 2. In its time it was believed to be uncrackable. Allied forces managed to crack the enigma machine during the war and Alan Turing played a key role in cracking it. In this article we’ll build the enigma machine. We’ll keep the implementation as close to the original as possible. But we’ll add a few modern conveniences to make it easier to use and harder to crack than the original. Let’s get cracking 🙂
The Enigma
The enigma machine is an electro-mechanical cipher machine. Apart from the keyboard and a lamp board, it consists of only three major components. The reflector, the rotors and a plugboard. The way enigma works is simple; every time you press a button on a keyboard a circuit is closed. This circuit goes through the plugboard, goes through several rotors (three in the original enigma) goes to the reflector, and back through the rotors to the plugboard and to the lamp board.
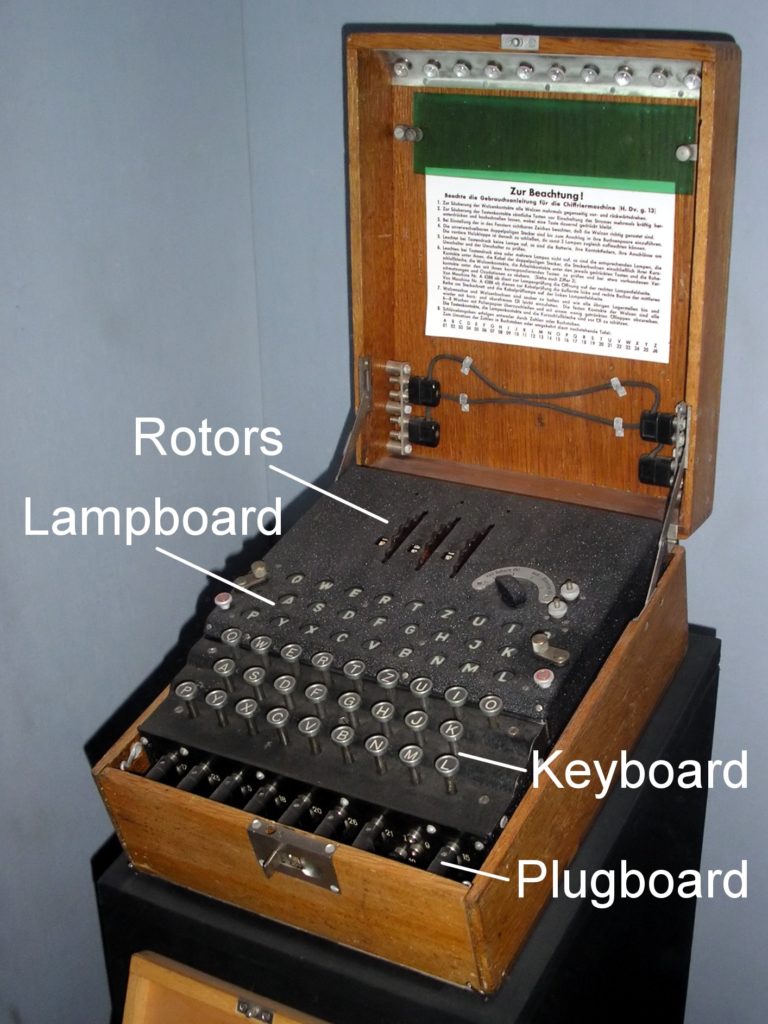
image source: wikipedia.org
What made enigma hard to crack was that every time you pressed a key on the keyboard the rotors would rotate and change the internal wiring of the enigma. So, if you pressed a letter ‘A’ and it encrypted to a letter ‘G’, the next time you press ‘A’ it might encrypt to ‘C’. Let’s see this on a diagram:
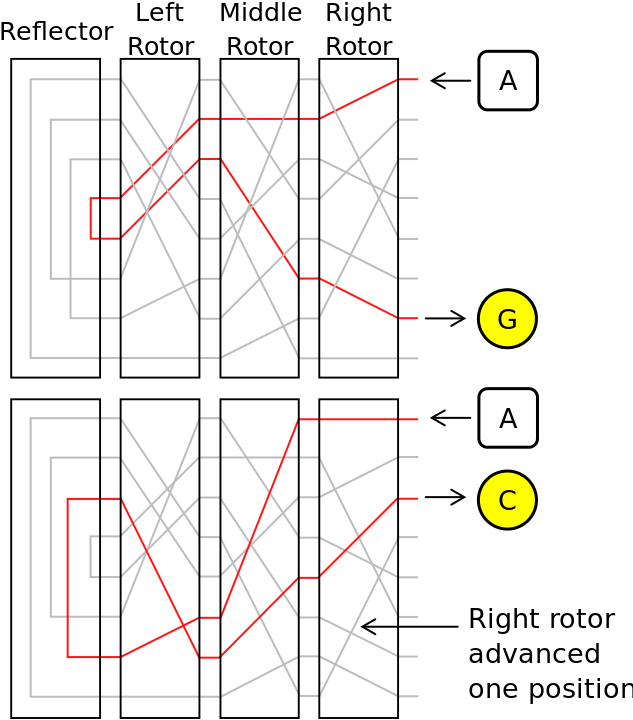
image source: wikipedia.org
For every key press on the enigma machine, the right rotor will rotate by one. When the right rotor completes a full rotation, the middle rotor will rotate by one, and so on.
With this mechanism in place, the pattern analysis is next to impossible. It will take a lot of characters and text before the letter ‘A’ encrypts to the letter ‘G’ again. To make things even more complicated, the germans added a ‘plugboard’. This was a simple board at the front of the enigma that ‘crisscrossed’ wires. For example, you could cross the wires for ‘A’ and ‘C’ so when you press ‘A’ on the keyboard the enigma machine would behave as if you pressed ‘C’. This simple mechanism added a lot of possible encryption combinations for one single letter making the enigma even harder to crack.
Rotors
Adding to the complexity, the germans had multiple rotors for the enigma machine. Depending of the version of the enigma machine, they had anywhere between 5 and 8 rotors. The standard enigma machine took in 3 rotors. The rotors were replaceable, so the operator would put in specific rotors in a specific order for each day of the month.
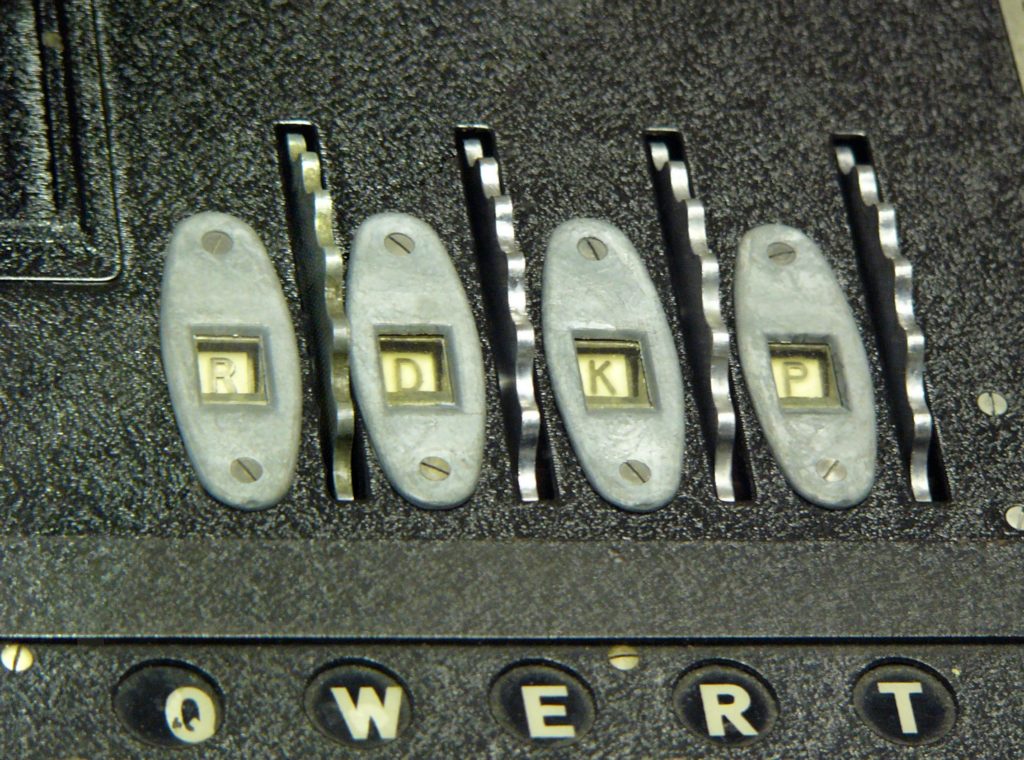
image source: wikipedia.org
The rotors were labeled with roman numerals (from I to VIII) and each rotor with a label ‘I’ was exactly the same. The wiring would have to be identical for each ‘number 1’ rotor all over Germany, otherwise the enigma wouldn’t work. Apart from changing the rotors, the operator would have to set the rotors to a predetermined setting. Remember, every time you type a letter on the enigma, the rotors rotate. The operator would manually rotate the rotors to a setting determined for that day.
Plugboard
One last thing for the operators to set was the plugboard. It was a board at the front of the enigma that would cross the wires for letters. ‘A’ to ‘C’ and ‘C’ to ‘A’, for example. It would always cross the letters in pairs. If ‘A’ was crossed with ‘C’ than ‘C’ would always cross to ‘A’. Only some of the letters were crossed (usually it was 6 pairs of letters).
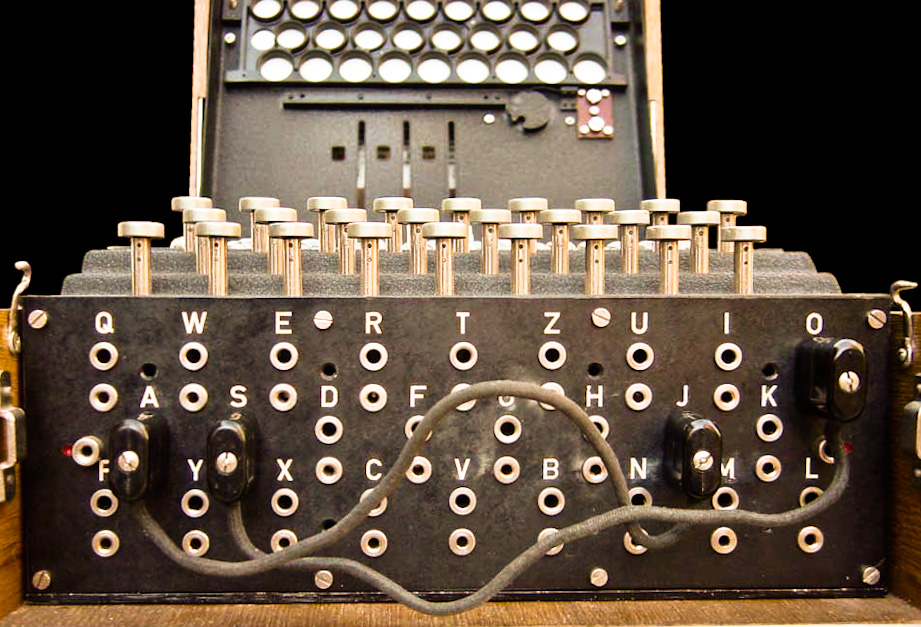
image source: wikipedia.org
Codebook
The germans had a codebook. In this codebook they had the enigma settings for every day of the month. Every enigma operator had a copy of the code book and knew exactly which rotors to use, in which order with what initial setting. It also had instructions for setting the plugboard.
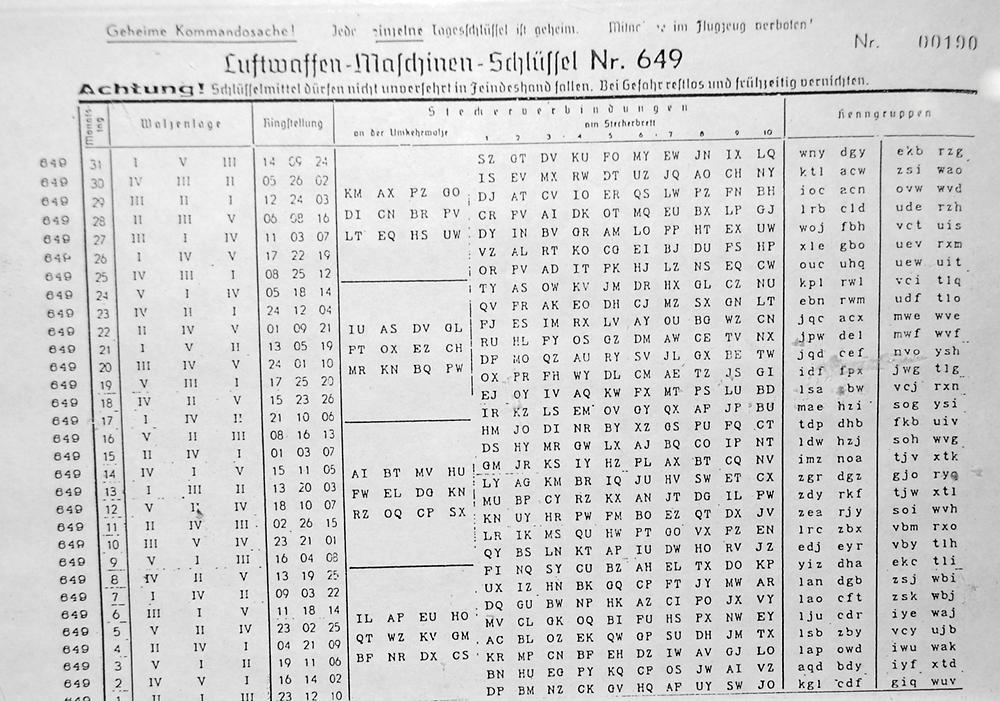
image source: wikipedia.org
The Protocol
The operators of the enigma could, in fact, change the rotor settings to what ever they wanted to. This was part of the protocol and it would make the enigma even harder to crack. The operators would choose their settings (they could be anything they wanted) and they would send the rotor settings using the standard settings for the current day. They would send the rotor settings twice, after which they would switch their enigma to those settings and continue the message.
The receiving enigma would begin to decrypt the message. It’s set to the same daily settings as the transmitting enigma, so it would get the key. It would change its rotor settings to the new key and decrypt the original message.
This is just a quick intro to how the enigma works. You can read a whole lot more on the internet. Check out the wikipedia article on the enigma. There is also an excellent youtube video by David Perry from NSA where he explains the enigma.
Let’s start coding our enigma…
The Code
It might sound complicated, but the enigma machine is actually quite simple to implement in code. The signal in the enigma machine always travels through the plugboard, from the right-most rotor to the left-most rotor, in the reflector, and back. We’ll call the reflector, rotors and a plugboard a spindle. If you think about it, a spindle is a pattern that we’ve already seen. It’s a chain of responsibility pattern.
Every object in our spindle has a simple task, take an input value and remap it to something else. We’ll be using mappings a lot in this example, so we have a simple structure for that:
The elements of our spindle will all conform to the same protocol:
In the spindle we’ll work with integers. So we’ll be remapping integers to other integers. In the actual ‘Enigma’ class we’ll have a final mapping where we’ll remap the integers to the actual alphabet. This will allow us to make the enigma a bit more generic.
Reflector
The reflector is a simple mapper, it will map a value to another one, it never maps to itself, and it doesn’t rotate. The reflector is also the last object in our chain, so we’ll implement it first:
After initialising the reflector with the mappings we create two dictionaries to optimise the performance. The reflector is always static so we can do this. Because the reflector is static, the shift and reset methods don’t do anything. Our remap method is quite simple, it just looks up a value in the dictionary and returns it to the caller.
Using the reflector is simple enough:
In the example above we’re mapping values from 1 to 10. We only have to make sure that we have exactly 5 pairs and that values don’t map to themselves.
Rotor
The rotor will be the most complex part of the spindle. We’ll be mapping values from source to the destinations. This will be the signal entering the rotor and traveling towards the reflector. We’ll also have to map values the other way. When the signal comes back from the reflector we have to map the values from the destination to the source. Here’s the section of code that does that:
On top of all that, the rotor will be shifting. We’ll shift the mappings with every shift and after a full rotation, we’ll shift the next rotor in the chain:
By shifting all the mappings by one, we’re simulating the rotation of the rotor in code. We also need a way to reset our rotor and set it to a predefined setting. We have two functions that do that:
The function for shifting the rotor by a certain number will take an array of integers. It will take the first one, shift itself, and pass the remaining integers down the chain to the next rotor.
The code for the rotor can be further optimised by using a dictionary for the mappings. Exactly like we did for the reflector. But in order to keep the code simple and easy to understand I omitted this optimisation from the code.
Plugboard
The last element of the spindle is the plugboard. Although, technically the plugboard is not a part of the spindle in the original enigma. The original enigma only contained rotors on a spindle. In the code I’m constructing a spindle with all three of the components because they form a nice chain of responsibility.
Plugboard is only slightly more complicated than the reflector:
This code should look familiar to you. The only thing to note in the code above is that we’re shifting the next rotor in the chain after each successful remap.
Constructing The Spindle
We are going to use a simple factory to construct our spindle. But first, to make our lives a bit easier, we’ll use a parameter object for our factory:
And now onto the factory:
First we create our reflector. Then the rotors, and finally the plugboard. The function returns the ‘plugboard’. Which is perfect, because all the calls to ‘remap’ will enter through the ‘plugboard’ and they will be passed down the chain and back up again.
The enigma we’re constructing can handle any number of rotors and it can map any number of values. In our example we’re using a small alphabet with two additional characters (space and period). The mappings are not visible in the code listing above, to see the mappings check out the file on GitLab.
The Final Implementation
Just one more class to go. What we’ve created so far is a mechanism that can take any number of mappings (integers from 0 to n) and any number of rotors, scramble them and de-scramble them. All we need are a couple of utility methods in order to make the enigma easy to use. We also need to implement the random key protocol. Which is simple enough.
We’ll skip some utility functions and focus on the most important ones. The first important function is the ‘encode’ function:
We have to reset the spindle to the daily rotor settings before sending the message. We generate a random key, one key per rotor. So in our case it’ll be three random integers. After converting those integers to characters, we’ll remap those characters to encoded characters. We set our rotors to the new random key and continue encoding the rest of the message.
The ‘decode’ message works in reverse:
First we set the enigma to the daily rotor settings from the ‘codebook’. We decode the key. Remember, we have three rotors, so we know that the first three characters in the message are the secret random key. We decode these three characters using the standard daily rotor settings. After getting the key, we set the rotors to the new key and decode the rest of the message.
Testing It
There are quite a few unit tests in the code example on GitLab you can check them out. Here we’ll create two simple enigmas and use one to encode and the other to decode. Yes, we could have easily used just the one instance of the enigma, but I wanted to show an example that’s closer to the real world application. Where one machine is encoding and the other is decoding messages.
We’ll cross six pairs of characters on the plugboard, use rotors 2, 1 and 5 and set them to some initial value:
After creating the two enigma instances, we’ll encode the good ol’ ‘Hello World.’ and see what happens in the console output:
End there you have it, we have a fully functional enigma machine. Pretty cool isn’t it 🙂
Conclusion
After watching a bunch of World War 2 documentaries on Netflix an idea just popped into my head… Wouldn’t it be cool if I tried to implement the enigma machine in swift. After doing some research on the actual machine I realised that the principles on which it was based are beautiful in its simplicity and decided to go for it and implement it.
Here we implemented a fully functional enigma machine that’s as close to the original as possible. Automatically selecting a random key, sending the random key only once and encoding two additional characters are some of the minor differences.
You can easily extend this enigma machine to use the entire UTF charset. All you have to do is implement your own factory.
This is a very interesting topic and you can find loads of material on the net about it. If you want to learn more, I would recommend this youtube video by David Perry from NSA. It’s a bit long, but it’ll explain the enigma to you perfectly.
You can find all the code from this article in the GitLab repo along with all the code snippets. As usual…
Have a nice day 🙂
~D;

Just wanted to say that I enjoyed your article. Great explanation on how an Enigma works. Went to GitHub and got your code working for MacOS (zero issues). I wished I had your knowledge of Swift. It will take me some time to understand your code.