 Making sure that your code follows swift coding styles and conventions can be a tedious task. Especially in larger teams. You can easily automate this process by using SwiftLint. SwiftLint is a great tool that will help you a lot. In this article we’ll get you started using SwiftLint.
Installation
There are many ways to install SwiftLint. You can use homebrew, cocoapods, mint, you can get the source and compile it yourself. We’ll be using homebrew. Installing it with homebrew is quite simple:
Make sure you run ‘brew update’ first 🙂
That’s it, you have SwiftLint installed. If it’s important to you to run a specific version of SwiftLint in your project, you can use cocoapods instead. Other than that, installing it system-wide with homebrew is definitely the simplest option.
Integration
You could run SwiftLint from the terminal in your project directory, you can integrate it with your CI, there’s even an official fastlane action for it. But we’ll integrate it with Xcode, just because it works so well with it 🙂
Go to your project settings and open the ‘Build Phases’ tab for your target. Add a new script runner phase:
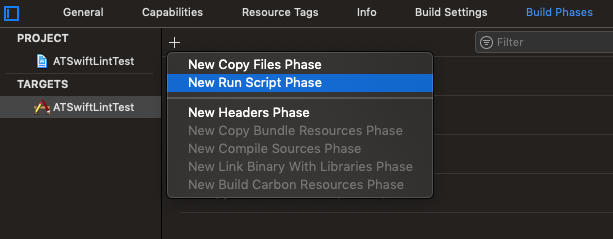
And add the script:
This is the script from the SwiftLint GitHub repo. It should be the same for everyone, unless you’re using SwiftLint with cocoapods. In that case you will have to set a correct path to swiftlint.
Usage
Using it is pretty simple, just build and run 🙂 You should start seeing some warnings:

Maybe some errors:
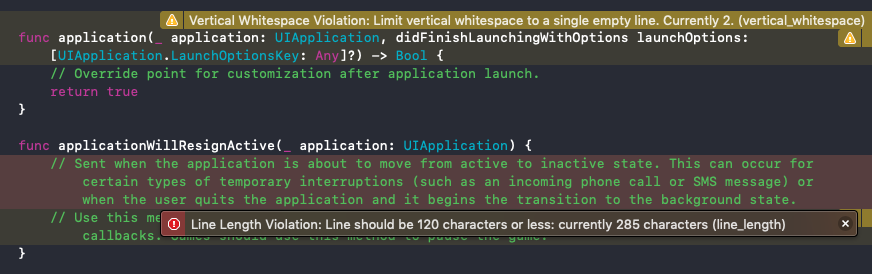
SwiftLint has a lot of rules that it’s using when evaluating your code. You can play with your code a bit and try to break some:

You can find the current list of rules on their GitHub repo.
Configuration
SwiftLint is pretty flexible and you can enable/disable the rules you want. You can even configure some of them or create your own. To configure it you’ll need to create a file called ‘.swiftlint.yml’ in your project directory. Here’s an example of how it might look like:
As you can see, I disabled the ‘trailing_whitespace’ rule, excluded some folders and modified some existing rules. For example, type name must be between 8 and 30 characters:

With a warning being thrown at 25 characters:

We have the same rule for the identifier name as well:

This is just a tiny example, you can customize the rules a lot more.
If the built-in rules don’t work for you, you can create your own rules. The custom rules are regex based and you can read more about it on their GitHub repo.
Conclusion
SwiftLint is a great tool that will make sure you and your team are following the swift coding styles and conventions. It’s real easy to use and integrate into your CI. It’s completely customizable and you can use only the rules you want. Or even write your own rules. It’s definitely worth checking out.
There’s a great video by the creator of SwiftLint, JP Simard. It’s definitely worth watching if you want to learn a bit more about the tool.
I hope you found a new toy to play with today and…
Have a nice day 🙂
~D;